Winter Pest Control Tips to Keep Pests Out

.jpg)
Seal 1/4-inch gaps to block mice-sized entries; audit foundations, utility penetrations, doors, and windows. Use silicone for small cracks; foam, backer rod, or mortar for larger voids; add 20‑gauge hardware cloth and tight door sweeps. Indoors, store food in airtight containers, remove trash daily, vacuum edges weekly, and keep humidity under 50%. Outside, trim vegetation 18 inches, maintain drainage, and manage bins 10+ feet from doors. Set thresholds and corrective actions within 48 hours—next, optimize monitoring and non‑toxic controls.
- Seal entry points 1/4 inch or larger with caulk, foam, mortar, and hardware cloth; add door sweeps and repair screens to block rodents and insects.
- Store food in airtight containers, empty covered trash daily, and clean crumbs and grease from counters and under appliances to remove attractants.
- Reduce indoor moisture below 50% with dehumidifiers and prompt leak repairs; pests like silverfish and roaches thrive in humidity.
- Trim vegetation 18 inches from the house, maintain soil-to-siding gaps, grade soil away from the foundation, and keep lidded bins 10+ feet from doors.
- Place tamper-resistant snap traps along walls and utility lines; monitor weekly and call a licensed professional for repeated activity or structural nesting.
Seal Entry Points and Shore Up the Building Envelope
Although snow can mask problems, winter is when small gaps become gateways. You’ll reduce rodent and insect pressure by sealing any opening 1/4 inch or larger; mice exploit holes as small as a dime, and rats use 1/2‑inch gaps.
Conduct a perimeter audit: inspect foundations, sill plates, utility penetrations, door thresholds, and window frames. Use silicone or polyurethane sealant for cracks under 1/4 inch; apply exterior‑grade expanding foam, backer rod, or mortar for larger voids.
Install 20‑gauge galvanized hardware cloth over vents and weep holes; fit door sweeps with ≤1/8‑inch clearance. Replace damaged weatherstripping. Cap chimneys with 3/8‑inch mesh.
Verify compliance: maintain documentation of inspections, materials, and corrective actions.
Reinspect after freeze‑thaw cycles; thermal movement reopens seals and creates new access points.
Tidy Up Indoors: Food Storage, Clutter, and Moisture Control

Even with exterior gaps sealed, indoor conditions can still sustain pests, so tighten controls on food, clutter, and moisture.
Store all dry goods in rigid, airtight containers; thin plastic and opened bags invite beetles and moths. Wipe crumbs and residues from prep areas nightly, and run a covered trash receptacle with daily removal. Vacuum along baseboards and under appliances weekly; cockroaches favor grease and debris.
Reduce harborage by minimizing cardboard; use sealed plastic bins and maintain clear floor space of at least 6 inches. Rotate stored items (“first in, first out”) to prevent long-term stowaways.
Control humidity under 50% using dehumidifiers and prompt leak repairs; silverfish and roaches thrive above that threshold. Install drip pans, insulate sweating pipes, and ventilate bathrooms for 20 minutes after use.
Outdoor Prep: Yard, Foundation, and Trash Management
Before cold snaps drive pests toward buildings, audit your exterior to remove attractants and block entry. Trim vegetation at least 18 inches from structures; research shows plants bridging siding increase rodent and ant incursions.
Maintain a 3–6 inch soil-to-siding gap and 2% grade away from the foundation to reduce moisture that attracts termites and sowbugs.
Seal gaps over 1/4 inch with mortar, silicone, or hardware cloth (1/4-inch mesh). Repair torn screens and door sweeps; verify thresholds have light-tight contact.
Inspect utility penetrations, sill plates, and weep holes; install rodent-proof covers where allowed.
Manage waste rigorously: use lidded, intact bins; clean residues weekly; store bins 10+ feet from doors; and place on racks, not soil.
Remove leaf litter, stacked wood, and debris; elevate firewood 18 inches and store 20 feet away.
Smart Traps and Non-Toxic Deterrents for Common Winter Pests
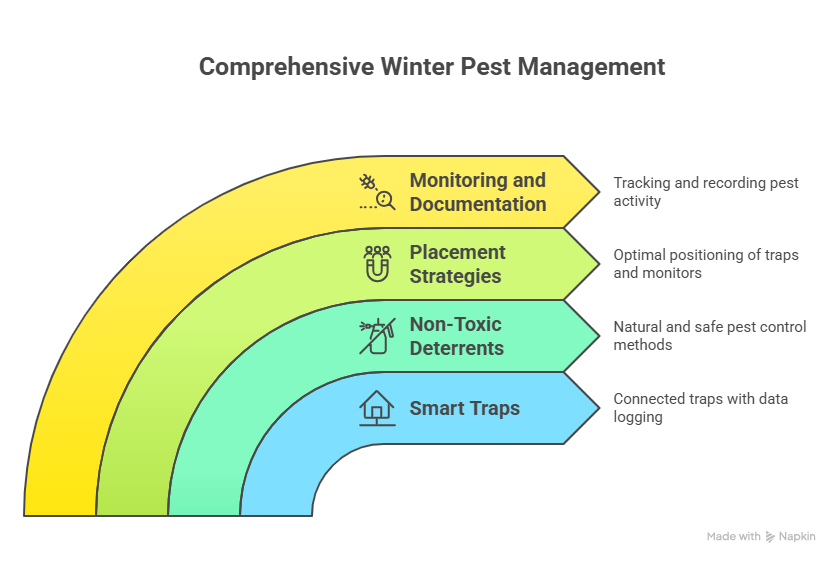
While winter pushes rodents and insects indoors, you can pair smart monitoring with non-toxic deterrents to cut risk without violating regulations or exposing occupants to unnecessary chemicals.
Deploy connected snap traps with tamper-resistant stations; choose models that log timestamps, location, and catch data for audit trails. Configure alerts to meet IPM documentation standards and local sanitation codes.
Position traps along runways and wall edges at 15–30 ft intervals for mice, 6–10 ft for rats. For insects, install smart sticky monitors near heat sources and utility penetrations.
Use non-toxic tools: HEPA vacuuming, diatomaceous earth in wall voids, silica gel dusts, and cryonite or heat spot treatments. Deter entry with peppermint or rosemary oil sachets, ultrasonic units validated to >60 dB SPL, and light leak sealing to reduce fly attraction.
Maintenance Schedule and When to Call a Professional
Because winter pressures can escalate quickly, set a formal IPM maintenance cadence: inspect high-risk zones weekly (food storage, utility penetrations, basements), check and rebait or reset traps per label every 7–10 days, and log findings in your digital audit trail within 24 hours to meet sanitation and recordkeeping requirements.
Standardize thresholds: one fresh rodent dropping, two active monitors with insects, or any gnaw marks trigger corrective actions within 48 hours.
Verify exclusion integrity monthly—door sweeps, weatherstripping, screen vents—and document corrective work orders.
Call a licensed professional when you detect structural nesting sites, repeated captures across two cycles, live activity in daylight, or when pesticide labels require certified applicators.
Request an inspection report with trend graphs, monitoring maps, chemicals used (EPA Reg. No.), target species, and reservice timelines.
Conclusion
You’ve tightened the building envelope, reduced food, moisture, and clutter, and prepped your exterior—now maintain it. Inspect seals, traps, and drainage monthly; log findings to verify corrective actions and compliance with local health and sanitation codes. Replace worn weatherstripping within 48 hours, empty traps per label directions, and store refuse in lidded, rodent-proof containers. If you detect droppings, gnaw marks, or live activity, call a licensed pest control operator. Document services and keep SDS and labels on file.