
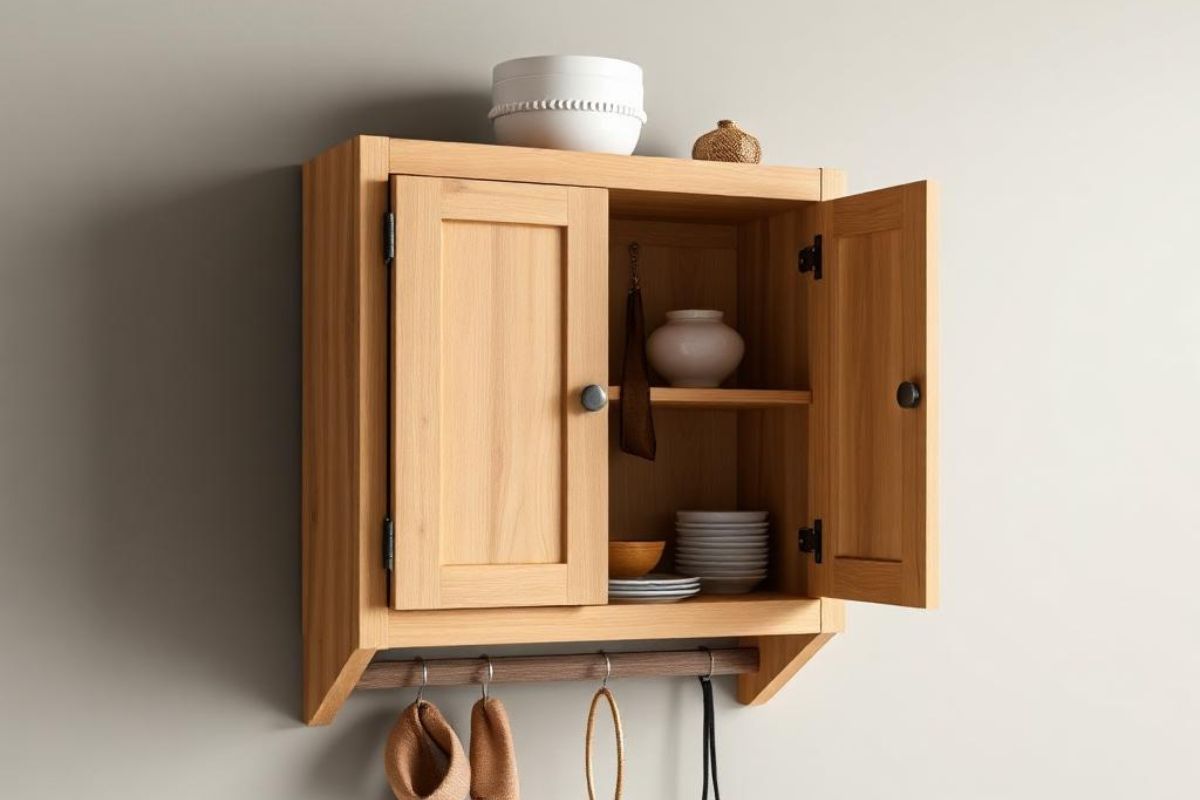
How to Hang Cabinets Securely: A Beginner’s Guide

.jpg)
To hang cabinets securely, start by measuring and planning your layout. Use a stud finder to locate and mark wall studs, ensuring you attach cabinets where they’ll be anchored well. Prepare your cabinets by removing shelves and cleaning surfaces. When hanging, use a level to make sure they’re straight, adjust with shims as needed, and secure them to the studs with screws. For additional tips and troubleshooting, stick around for more detailed guidance.
- Measure and mark cabinet height accurately, ensuring it's about 18 inches above the countertop for optimal placement.
- Use a stud finder to locate and mark wall studs, as these provide the necessary support for hanging cabinets securely.
- Remove shelves and doors from cabinets before installation to reduce weight and make handling easier.
- Level each cabinet during installation, using shims as needed to ensure they are plumb and aligned properly.
- Secure cabinets to wall studs with appropriate screws and connect adjacent cabinets for added stability and strength.
Tools and Materials Needed
To hang cabinets securely, you'll need a few essential tools and materials. First, gather a drill and drill bits to create pilot holes. A level is vital for guaranteeing your cabinets are straight. You'll also need a stud finder to locate wall studs, providing the necessary support for heavy cabinets. Don’t forget a measuring tape to confirm accurate positioning. For mounting, grab cabinet screws or lag bolts, depending on your cabinet type. A square will help you maintain right angles during installation. Finally, have a pencil handy for marking measurements. With these tools and materials at your side, you'll be well-equipped to tackle cabinet installation confidently and efficiently.
Measuring and Planning Your Layout
Accurate measuring and thoughtful planning are essential steps in hanging cabinets securely. Start by determining the height you want your cabinets to sit—typically, 18 inches above the countertop is standard. Use a level to mark the desired height on the wall, ensuring a straight line across the area. Next, measure the width of your cabinets and decide how much space you want between them and any adjacent walls or appliances. It's wise to sketch a layout, noting the placement of each cabinet. This way, you'll have a clear vision and minimize mistakes. Remember to take into account any obstacles like outlets or windows. With your measurements and layout in hand, you’re ready to move on to the next important steps.
Finding and Marking Studs
Once you've got your layout and measurements sorted, the next step is finding and marking the studs in your wall. Start by using a stud finder, which easily detects where the studs are located. Move it horizontally along the wall, and mark each stud's position with a pencil. If you don’t have a stud finder, you can tap the wall lightly; a hollow sound indicates a space between studs, while a solid sound usually means you've hit a stud. Most studs are 16 or 24 inches apart, so once you find one, measure from that point to locate the others. Make sure to mark the top and bottom of each stud for easy reference when hanging your cabinets.
Preparing the Cabinets for Installation
Preparing your cabinets for installation is an essential step to guarantee they hang securely and look great in your space. Start by removing all shelves, doors, and hardware from the cabinets. This makes them lighter and easier to handle during installation. Next, check for any damage or imperfections; repair them before proceeding. If your cabinets come with adjustable shelves, verify they’re set to the desired height. Clean the surfaces to remove dust and debris, which can affect adhesion and finish. Finally, gather all necessary tools and hardware, like screws and brackets, to streamline the installation process. Proper preparation will save you time and guarantee a smoother installation experience, leading to a professional-looking result.
Installing the Upper Cabinets
With your cabinets prepped, you’re ready to start installing the upper cabinets. Begin by positioning the first cabinet against the wall, making sure it aligns with your marked guidelines. It’s helpful to have a partner hold the cabinet in place while you secure it. Use a stud finder to locate wall studs and drill pilot holes for the screws. If your cabinet has hanging rails, make sure they’re flush against the wall. Insert screws through the cabinet into the studs, ensuring a tight fit. Repeat this process with the other cabinets, maintaining the same alignment. Remember to check for any obstructions like electrical outlets. Once you’ve installed all the upper cabinets, you can move on to the next essential steps.
Leveling and Securing the Cabinets
Leveling and securing your cabinets is essential for a professional finish and long-term stability. Begin by using a level to check that each cabinet is plumb, adjusting as needed with shims. Make certain to check both the sides and the front to guarantee everything is perfectly aligned. Once leveled, secure the cabinets to the wall studs using appropriate screws. This prevents sagging and guarantees they can support the weight of items you’ll store inside. For added stability, connect adjacent cabinets with screws through their faces, making sure to drill pilot holes to avoid splitting the wood. Finally, double-check your level one last time before moving on to the next step. Your hard work will pay off in a polished, secure installation.
Installing Lower Cabinets
Before you plunge into installing lower cabinets, it's crucial to guarantee you have all your tools and materials ready. You’ll need a level, drill, screws, and a stud finder. Start by marking the wall where the cabinets will go, ensuring they're aligned and level. Next, attach the cleat to the wall where the bottom of your cabinets will sit. Lift the cabinets into place, resting them on the cleat. Use your level again to confirm they're straight. Secure the cabinets to the wall by drilling screws through the cabinet back into the wall studs. Make sure each cabinet is tightly fastened, creating a solid base for your kitchen. Double-check everything before moving on to the next steps.
Adding Finishing Touches
Once you've securely installed your cabinets, it’s time to add those finishing touches that enhance both functionality and aesthetics. Start by attaching cabinet doors and ensuring they align properly. You can adjust hinges to achieve even spacing and smooth operation. Next, add cabinet hardware like knobs or pulls; they not only serve a practical purpose but also elevate your design. Consider applying a coat of paint or stain to match your décor if you’re working with unfinished wood. Don’t forget to install trim or molding at the top and bottom for a polished look. Finally, check that all screws and fasteners are tight, ensuring your cabinets are both beautiful and secure. These details will make a significant difference in your space!
Safety Tips While Installing Cabinets
As you put the finishing touches on your cabinets, it's important to keep safety in mind during installation. Always wear safety goggles and gloves to protect yourself from dust and sharp edges. Guarantee your workspace is clean and free of clutter to prevent tripping hazards. When using a ladder, make sure it’s stable and positioned on a flat surface. Avoid overreaching; instead, move the ladder to access difficult areas. If you’re lifting heavy cabinets, use proper lifting techniques—bend at your knees, not your back. Make sure your tools are in good condition and suitable for the job. Finally, keep children and pets away from the installation area to avoid accidents. Prioritizing safety will help guarantee a smooth installation process.
Troubleshooting Common Installation Issues
While installing cabinets, you might encounter a few common issues that can disrupt your progress. One issue is misalignment; if your cabinets aren't level, double-check your measurements and adjust the mounting brackets as needed. If you notice gaps between cabinets, use shims to bridge those spaces for a seamless look. Sometimes, screws can strip or break, so keep a set of replacements handy to avoid delays. If your cabinets feel wobbly, make certain you're anchoring them properly to the studs. Finally, if doors don’t close smoothly, check the hinges for tightness and adjust as necessary. By addressing these issues promptly, you'll keep your installation on track and achieve a professional finish.
Conclusion
Now that you know how to hang cabinets securely, you’re ready to tackle your installation project with confidence. Remember to gather all your tools and materials beforehand, measure carefully, and locate those studs for a strong hold. Take your time during the installation process, and don’t hesitate to refer back to your planning layout. With these tips in mind, you’ll achieve a polished look in your space that’s both functional and stylish. Happy hanging!


.jpg)