Winter Entryway Organization Ideas for Less Clutter


Map vertical zones: high for seldom-used gear, mid for daily, low for kids. Install a rail with heavy-duty hooks and stagger placements. Add slim two-tier shoe racks and a boot tray with a grate to dry boots. Use drip-proof mats. Sort gloves, hats, and scarves into labeled, breathable bins—one per person. Choose a compact bench with hidden storage. Label everything, clean weekly, and rotate seasonal items. Keep a small changeover kit for surprises—there’s more to streamline next.
- Mount a rail with staggered, labeled hooks; place daily items at mid-height and seldom-used gear up high.
- Add slim, two-tier shoe racks and a boot tray with a grate to protect floors and improve airflow.
- Use labeled, breathable bins for gloves, hats, and scarves; assign one container per person and category.
- Choose a compact bench with flip-top storage; divide interior with bins for specific winter items.
- Set weekly tidy-ups and monthly purges; rotate seasonal gear and keep a small transition kit by the door.
Maximize Wall Space With Multi-Use Hooks
Start by mapping vertical zones: high for seldom-used gear, mid for daily grab-and-go, low for kids.
Install a rail or cleat strip to anchor hook positions and keep them straight. Choose heavy-duty, rust-resistant hooks for wet coats and bags; lighter double hooks handle scarves and hats.
Stagger placements to prevent bulky sleeves from overlapping.
Assign hooks by person and function. Label them with tags or color bands so items return to the same spot.
Add a few S-hooks for umbrellas and dog leashes. Mount a narrow shelf with underside hooks for keys and mail, keeping pockets clear.
Leave 6–8 inches between hooks, 12–15 for puffy coats. Use wall studs or proper anchors.
Do a quick weekly reset and adjust spacing as winter layers change.
Slim Shoe Racks and Boot Trays That Save Floors
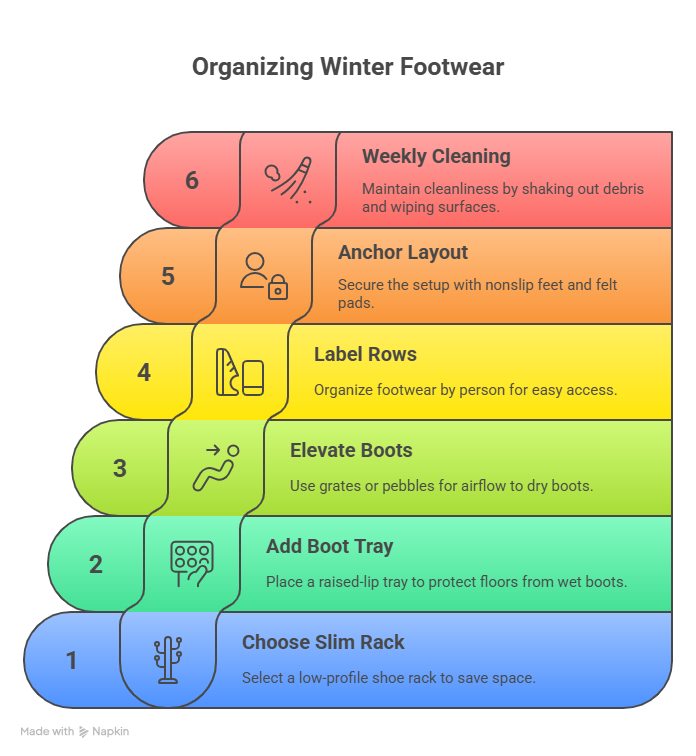
Even in a narrow entry, you can corral winter footwear with low-profile solutions that don’t steal walking space. Choose a slim, two-tier shoe rack (depth 10–12 inches) to line up everyday pairs without blocking the door swing. Opt for metal or sealed wood for durability, and measure heel-to-toe length so sneakers and loafers sit flush.
Add a dedicated boot tray to protect floors and create a park-and-leave zone. Pick a raised-lip tray sized to your household’s pair count; place it under the lowest rack tier or beside it to separate tall boots.
Elevate boots with removable grates or pebble liners for airflow. Label rows by person. Anchor the layout with nonslip feet and felt pads. Weekly, shake out debris and wipe surfaces.
Drip-Proof Mats to Contain Snow and Slush
When snow follows you inside, choose drip-proof mats that trap meltwater before it spreads.
Prioritize raised-edge mats with waterproof liners; they corral slush and keep nearby floors dry. Pick heavy, non-slip backings so mats stay put when traffic’s high. Measure your entryway width and door swing; leave clearance so doors open freely.
Select materials by zone: rubber for high traffic, absorbent microfiber with waterproof backing for secondary spots. Place one mat outside to knock off bulk, another inside to capture drips. Angle mats toward the path you use most. Add a narrow runner to bridge wet zones.
Maintain weekly: shake outside, scrub with mild detergent, rinse, and air-dry flat.
In deep winter, rotate a dry backup mat to prevent saturation and odors.
Baskets and Bins for Gloves, Hats, and Scarves
Although winter gear multiplies fast, corral it with labeled baskets and bins sized by user and item. Assign one container per person and one per category: gloves, hats, scarves.
Use breathable bins for wool, mesh for quick-dry synthetics, and solid sides for small kids’ items. Choose stackable or cubby-friendly sizes to fit your entryway.
Create clear labels: name + item type. Use clip-on tags or wipeable labels so you can update easily. Place kid bins low; adult bins at eye level. Keep a “spares” bin for mismatched gloves.
Set a simple rule: one in, one out. Do a two-minute nightly reset—return strays, pair gloves, remove wet items.
Seasonal check monthly: purge stretched, holey, or outgrown pieces. Maintain space, prevent piles, and find essentials fast.
Compact Benches With Hidden Storage
Two-in-one seating solves tight entryways: choose a compact bench that hides storage for boots, bags, and winter extras.
Pick a bench under 36 inches wide to fit narrow walls. Prioritize a flip-top or pull-out drawer; measure interior height for tall boots. Select water-resistant finishes and wipeable cushions to handle slush. Add boot trays inside to contain drips.
Divide the space: use small bins for hats and gloves, a low section for shoes, and a lidded pouch for keys.
Label bins so everyone knows where items go. Place felt pads under legs to protect floors. Anchor the bench if it’s top-heavy.
Set rules: store daily-use items only, empty wet gear nightly, and purge weekly.
Keep a microfiber cloth inside for quick wipe-downs.
Vertical Solutions for Small Entryways
Start by building up, not out: use wall space from floor to ceiling to keep traffic paths clear.
Mount a narrow rail with staggered hooks at adult and kid heights for coats, scarves, and umbrellas.
Add a high shelf for off-season gear; keep a grab-and-go shelf at eye level for daily winter essentials.
Install vertical cubbies or slim lockers to separate wet and dry items.
Use over-the-door racks for hats and gloves.
Place a compact umbrella stand or wall-mounted drip tray near the entry to contain melt.
Add a slim shoe tower or tilted racks to lift footwear off the floor.
Corral salt and ice melt on a wall bin above a mat.
Finish with a mirror-mounted shelf to hold keys and free pocket space.
Labeling Systems to Keep Everyone Organized
A few smart labels turn winter chaos into a routine you can stick to. Start by mapping zones: coats, boots, hats, gloves, mail, returns.
Give every hook, bin, and shelf a clear, durable label. Use bold fonts or icons for kids: a boot icon, a mitten icon, a mail envelope. Color-code by person—blue for you, red for partner, green for each child.
Choose materials that won’t peel in damp air: plastic tag holders, laminated stickers, or metal key tags.
Place labels where eyes land first: basket fronts, shelf edges, hook backs. Keep verbs simple: “Hang Coat,” “Drop Mail,” “Wet Gear,” “Keys.”
Post a 1-minute reset checklist at eye level. Review labels weekly, adjust categories that cause pileups, and retire any unused bins.
Quick-Clean Materials and Maintenance Tips
While winter messes pile up fast, you can outpace them by choosing surfaces that wipe clean in seconds.
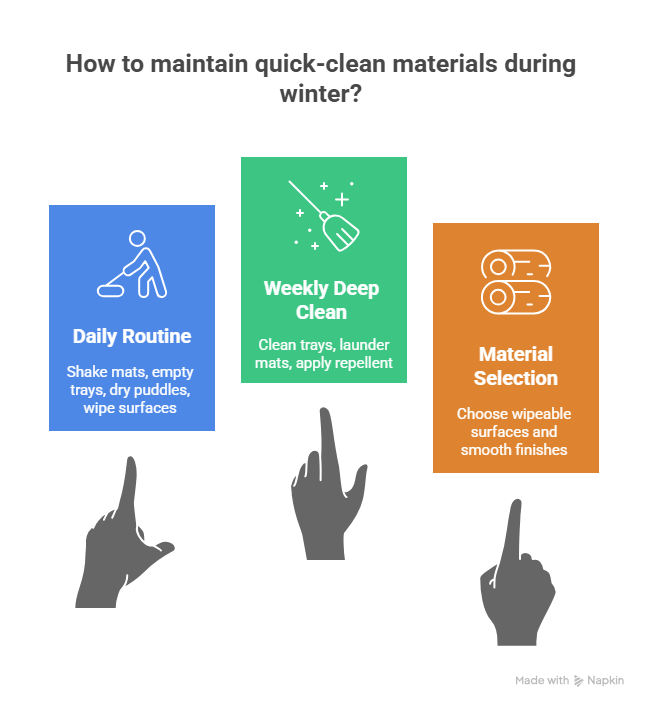
Pick sealed wood, powder-coated metal, or laminate for benches and cubbies. Use wall hooks with smooth finishes. Choose boot trays with raised edges and rigid plastic; line them with cut-to-fit rubber mats for grip.
Lay low-pile, rubber-backed mats inside and out; vacuum daily, shake outside, and spot-clean with diluted dish soap. Protect walls with semi-gloss paint or clear wipeable panels behind hooks. Store salt and scraper in a labeled caddy near the door.
Set a fast routine: shake mats, empty boot trays, towel-dry puddles, and run a microfiber cloth over high-touch areas.
Weekly, deep-clean trays, launder mats, and reapply water-repellent spray to benches.
Seasonal Swap-Outs to Stay Clutter-Free
If you rotate gear by the calendar, you’ll keep the entry clear and responsive to weather. Set quarterly reminders.
At the start of winter, stage only cold-weather essentials: coats, snow boots, waterproof gloves, hats, scarves, ice scraper, umbrella.
Store fall items in labeled bins: “Light Jackets,” “Rain Shoes,” “Everyday Hats.” Use one-in, one-out rules for hooks and baskets.
Create swap zones: a boot tray, a glove bin per person, and a high shelf for off-season bins.
Color-code labels so kids return items fast. Vacuum-seal seldom-used layers to save space.
Midseason, audit: remove duplicates, mend, launder, or donate.
Before spring, pre-pack winter by category, note gaps on a restock list, and wipe shelves.
Keep a slim “transition kit” for unpredictable days.
Conclusion
You’ve got a simple system to keep winter mess under control. Use hooks, slim racks, and drip-proof mats to catch the chaos. Corral accessories in labeled bins, and choose compact benches with hidden storage. Go vertical in tight spaces, stick to quick-clean materials, and set a weekly reset. Swap seasonal gear as temperatures change, donating what you don’t use. Stay consistent: everything has a spot, and everything returns to it. You’ll walk into a calm, clutter-free entryway all winter.