Winter Roof Maintenance Tips to Prevent Damage

.jpg)
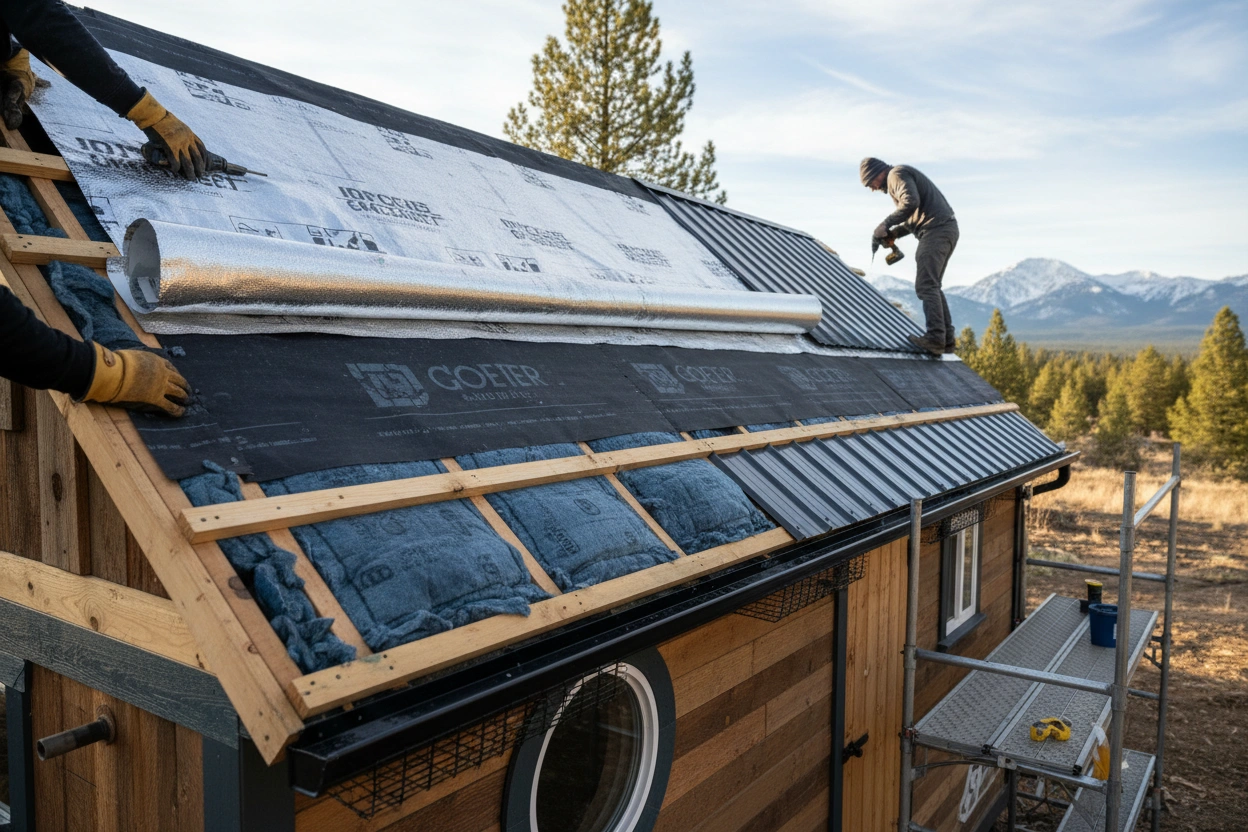
Inspect shingles and flashing before the first freeze; look for curled, cracked, missing pieces, exposed fasteners, and corroded flashing at chimneys, sidewalls, and skylights. Clear debris with plastic tools, maintain gutters/downspouts with proper pitch and 5-foot discharge, and seal seams with compatible sealant.
- Inspect shingles and flashing for cracks, corrosion, or missing pieces, especially on south- and west-facing slopes; schedule repairs before freezing weather.
- Clear leaves, branches, and debris using soft tools to prevent moisture traps and windborne damage; hire a pro for steep or slick roofs.
- Clean and secure gutters and downspouts, verify correct pitch, seal seams, and discharge water at least 5 feet from the foundation.
- Prevent ice dams by sealing attic air leaks, adding code-level insulation, and installing baffles to maintain eave airflow.
- Improve attic ventilation with balanced intake and exhaust targeting about 1:300 NFVA; clear soffit vents and use baffled ridge vents in snow regions.
Add code-appropriate attic insulation, air-seal penetrations, and guarantee balanced ventilation (about 1:300 NFVA) with clear soffits and baffled ridge vents. Remove snow carefully, avoid heat cables, and hire pros for hazards—there’s more you can do next.
Inspect Shingles and Flashing Before the First Freeze
Start with a systematic visual check of all roof planes, prioritizing south- and west-facing slopes where UV and thermal cycling are highest. From the ground with binoculars, look for curled, cracked, missing, or slipped shingles and exposed fasteners. Note granule loss concentrated in valleys and at penetrations.
Verify flashing at chimneys, sidewalls, step changes, and skylights lies flat, laps shingle courses correctly, and is free of corrosion or open seams.
Use fall protection if you must access the roof; follow OSHA-compliant ladder setup and anchor points. Probe suspect shingles and sealant with a plastic tool, not metal. Check counterflashing embedment in mortar joints and the integrity of kick-out flashing at lower terminations.
Document defects, then schedule repairs per manufacturer instructions and local code.
Clear Debris and Keep Roof Surfaces Clean

Before sustained cold sets in, clear organic debris, windblown litter, and construction residues from roof surfaces, valleys, and around penetrations to prevent moisture traps, ice dams, and premature membrane or shingle deterioration.
Use a soft-bristle broom or plastic leaf rake; don’t use metal tools that can gouge shingles or puncture membranes. Work from a stable ladder with fall protection per OSHA guidelines.
Remove branches abrading surfaces and relocate loose items that can become windborne. Around skylights, vents, and chimneys, brush away fines and granule piles that impede drainage and stress sealants.
For low-slope roofs, sweep ponding areas and remove embedded gravel clumps to protect seams. Document conditions with photos.
If slopes, snow, or slick algae present fall hazards, hire a licensed roofer with proper access equipment.
Maintain Gutters and Downspouts for Proper Drainage
Although roof surfaces shed water, your drainage system does the heavy lifting—inspect and service gutters, downspouts, and leaders so meltwater moves off the roof without backing up.
Verify gutters are securely fastened, pitched 1/16–1/8 inch per foot toward outlets, and free of leaves, grit, and asphalt granules. Use ladder safety: stabilize feet, maintain three points of contact, and keep power lines clear.
Install corrosion-resistant strainers at outlets and clean them routinely. Confirm downspouts discharge at least 5 feet from the foundation or to code-approved storm piping; add extensions or splash blocks as needed.
Seal seams and end caps with compatible gutter sealant. Replace loose hangers with spaced supports per manufacturer. Avoid heat cables here; rely on clear, continuous drainage paths and sound mechanical connections.
Prevent Ice Dams With Adequate Attic Insulation
With drainage paths clear, stop ice dams at their source by controlling heat loss through the attic.
Add insulation to achieve the code-required R-value for your climate zone (often R-49 to R-60 in colder regions per IECC). Measure existing depth, then top up with unfaced fiberglass or blown-in cellulose to reach target R. Seal attic penetrations first—recessed lights, plumbing stacks, wiring holes—using fire-rated sealant or covers where required.
Create a continuous thermal layer over the ceiling plane.
Install baffles at eaves before adding loose-fill to keep insulation from contacting the roof deck and to preserve airflow paths. Maintain 3 inches clearance around non-IC fixtures and flues; use Type II metal shields for chimneys. Protect access hatches with weatherstripping and insulated covers. Document R-values and product labels.
Improve Attic Ventilation to Reduce Moisture and Heat Buildup
Even when insulation is correct, poor attic ventilation traps heat and moisture that shorten shingle life and invite mold.
You need balanced intake and exhaust so cold, dry air enters low and warm, moist air exits high. Target about 1:300 net free vent area (NFVA) of attic floor area, or 1:150 if a vapor retarder is absent; split NFVA roughly 50/50 between soffit and ridge.
Verify manufacturer NFVA for each vent type and don’t mix power fans with ridge vents.
Clear blocked soffit vents, remove insulation baffles that are crushed, and install code-compliant baffles to maintain a 1- to 2-inch airflow path at eaves.
Keep exhaust vents at least 3 feet from plumbing or mechanical terminations.
In snow regions, use baffled ridge vents rated for wind-driven snow.
Seal Gaps and Check for Leaks Around Penetrations
Start by inspecting every roof penetration—chimneys, skylights, plumbing stacks, satellite mounts, and vent housings—for failed sealant, cracked flashing, loose fasteners, and gaps.
Look for water staining, rust tracks, lifted shingles, and daylight from the attic. Verify step and counterflashing are properly lapped and terminate under the courses per manufacturer instructions and local code.
Re-torque accessible fasteners to spec and replace corroded hardware.
Clean and dry substrates, then apply compatible, roof-grade sealant or flashing cement within temperature ranges.
Don’t bridge moving joints with caulk alone; install new neoprene boots or gasketed collars on stacks. Reseat storm collars and seal tops only, not bottoms, to allow drainage.
Maintain 2-inch clearance to combustibles around chimneys; repair cracked mortar and caps.
If decking feels spongy, stop and call a licensed roofer.
Safely Remove Snow Buildup Without Damaging the Roof

Although heavy snow can look harmless, treat it as a structural load and manage it before it exceeds safe limits. Monitor accumulation and drift depth, especially near valleys, parapets, and leeward edges.
From the ground, use a non-metal roof rake with a telescoping handle; pull snow downward with light passes, leaving the bottom inch to protect shingles and membranes. Don’t pry, hack, or use salt or calcium chloride on roofs.
Work from stable ground; don’t climb a snowy roof. Keep clear of overhead lines and falling snow paths. Protect ventilation terminations and gas appliance vents from blockage.
Clear eaves first to reduce ice-dam pressure, then relieve uniform areas to avoid unbalanced loading. Stage removal in increments, alternating sides, to maintain load symmetry and prevent localized overstress.
Know When to Call a Professional for Repairs and Assessments
If you’ve managed surface snow safely, the next step is knowing when the roof needs a licensed pro. Call immediately if you see sagging rafters, new interior leaks, ceiling bubbling, ice dams at eaves, loose flashing, lifted shingles, or exposed fasteners.
Any structural movement, cracking sounds, or persistent attic frost warrants evaluation.
Don’t access steep or icy roofs. A qualified contractor will perform a fall-protected inspection, check ventilation and insulation ratios, verify underlayment integrity, and assess load paths to code.
They’ll document moisture intrusion with infrared or moisture meters and follow manufacturer specs for repairs to preserve warranties.
Choose insured, licensed roofers familiar with snow-load design per local code and ASCE 7.
Request a written scope, materials, fastener schedules, and permits when required.
Conclusion
Stay proactive to keep your roof code-compliant and safe all winter. Inspect shingles and flashing, clear debris, and maintain gutters for proper drainage. Add insulation to prevent ice dams, improve attic ventilation to control moisture, and seal penetrations to stop leaks. Remove snow with non-damaging tools and safe methods, avoiding metal edges and steep pitches. Document findings, follow manufacturer specs and local codes, and schedule professional assessments when conditions exceed your skill, access, or fall-protection capabilities. Prevention costs less than repairs.