Herringbone Kitchen Backsplash: Timeless Pattern for a Stylish Upgrade

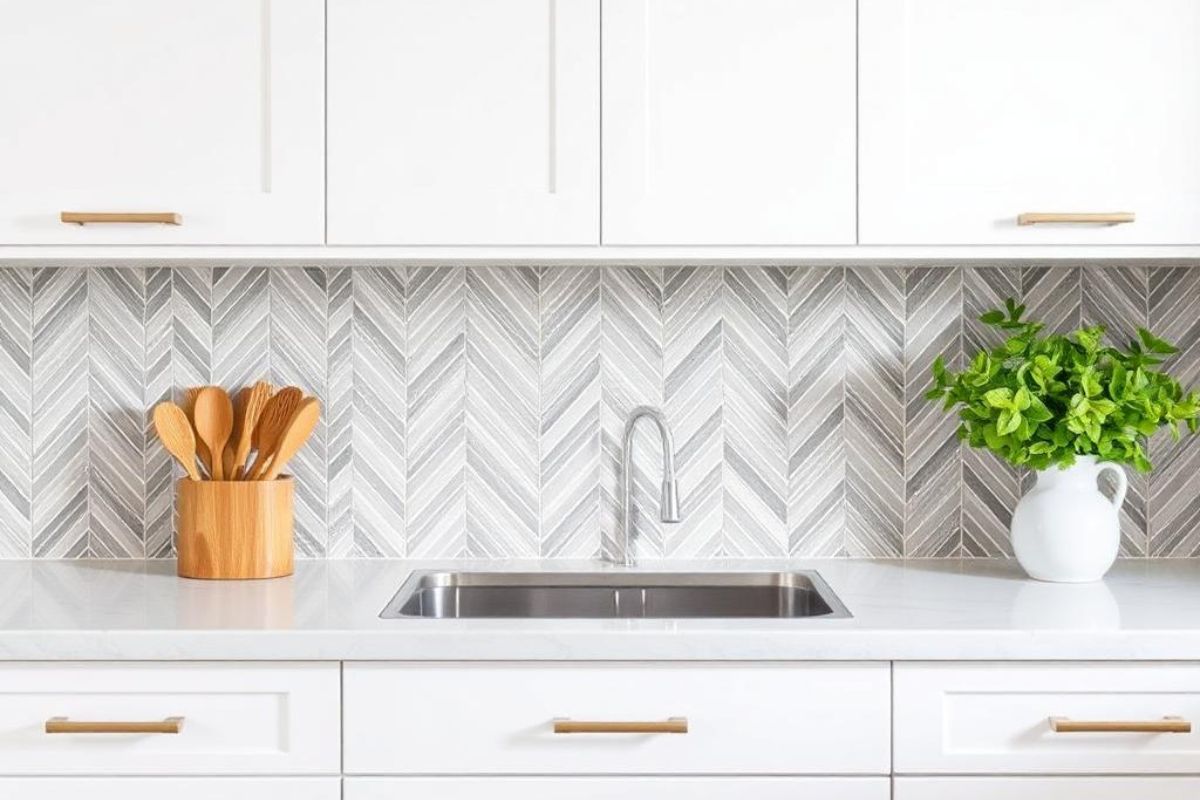
A herringbone kitchen backsplash instantly transforms your space with its V-shaped zigzag pattern, adding elegance and movement that catches the eye. You’ll love how it disguises wall imperfections and works with both modern and traditional décor. Choose crisp subway tiles for a classic look or experiment with bold colors and luxe materials for extra flair. With the right installation tips and care, your backsplash will stay stunning. Stick around for inspiring ideas and practical how-tos next.
- The herringbone backsplash features a dynamic V-shaped pattern that adds sophistication and visual interest to any kitchen.
- Rectangular tiles, such as classic subway tiles, are essential for achieving the signature zigzag effect of the herringbone design.
- This timeless pattern complements both modern and traditional kitchen styles, making it highly versatile for various décor preferences.
- Choosing bold colors or mixing in metallic and glass tiles can create a striking, customized look.
- Herringbone backsplashes are durable, disguise wall imperfections, and are easy to maintain with regular cleaning and occasional grout sealing.
What Makes Herringbone Backsplash Unique
While there are many ways to lay tile, a herringbone backsplash stands out because of its distinctive V-shaped pattern that instantly draws the eye. You’ll notice how this layout creates movement and energy, making even a simple kitchen feel more dynamic and stylish. The interlocking angles catch light differently, which adds depth and texture to your walls. Herringbone’s visual interest works well with any décor style, from modern to traditional, so you don’t have to worry about it feeling dated. Plus, the pattern naturally disguises small imperfections, which can be helpful if your walls aren’t perfectly even. By choosing herringbone, you’re adding a touch of sophistication and craftsmanship that elevates your kitchen from the ordinary to the extraordinary.
Choosing the Right Tiles for a Herringbone Pattern
One of the most important steps in creating a herringbone backsplash is picking the right tiles for the job. To achieve the signature zigzag effect, you’ll want to select rectangular tiles—subway tiles are a classic choice, but you can experiment with other sizes, too. Make sure the tiles have straight, even edges so they fit together cleanly and keep the pattern crisp. Consider the tile’s thickness and edge style; beveled edges create a more pronounced texture, while flat edges offer a sleek, modern look. Also, pay attention to tile size—longer, slimmer tiles add drama, while shorter ones give a traditional vibe. Before you buy, lay out a few tiles to visualize how the pattern will look in your space.

Color and Material Options to Consider
Color and material choices set the tone for your herringbone backsplash, influencing both style and function. If you want a classic, timeless look, consider crisp white subway tiles—they reflect light and suit almost any kitchen décor. For a bolder statement, go for deep blues, emerald greens, or matte black tiles. Don’t be afraid to mix in metallic or glass accents for a touch of luxury or added texture.
When it comes to materials, ceramic and porcelain tiles are top picks for their durability and easy upkeep. If you’re aiming for a high-end vibe, marble or natural stone offers organic variation and a unique finish, though they require more care. Consider how your chosen colors and finishes will complement your countertops, cabinetry, and overall kitchen palette.
Step-by-Step Guide to Installing Herringbone Backsplash
Before you plunge into setting your first tile, preparation is key for a flawless herringbone backsplash. Start by turning off power to outlets and clearing your workspace. Clean the wall thoroughly and patch any holes. Measure your area, then use a level and pencil to mark a centerline—this anchors your herringbone pattern. Dry-lay a few tiles to get comfortable with the angles. Mix your adhesive and spread it evenly using a notched trowel.
Begin tiling at the centerline, setting one tile at a 45-degree angle. Continue placing tiles, working outward in both directions, and use spacers for uniform gaps. Don’t rush; double-check alignment as you go. Once the adhesive sets, apply grout with a rubber float, then wipe away excess and let it cure.
.jpg)
Tips for Achieving a Seamless Look
Even the most eye-catching herringbone pattern can lose its impact if the details aren’t just right. To achieve a seamless look, start by double-checking your layout before setting any tiles—dry-fit a few rows to verify alignment. Use tile spacers consistently so your grout lines stay uniform across the backsplash. Don’t rush when applying adhesive; keep it even and avoid excess, which can seep through the joints. Pay close attention to your cuts, especially around outlets and corners—sharp, precise edges will help the pattern flow smoothly. Choose a grout color that complements your tiles without creating harsh contrast. Finally, step back as you work to catch any misaligned tiles early. These small adjustments will make your herringbone backsplash look polished and professional.
Cleaning and Maintenance Best Practices
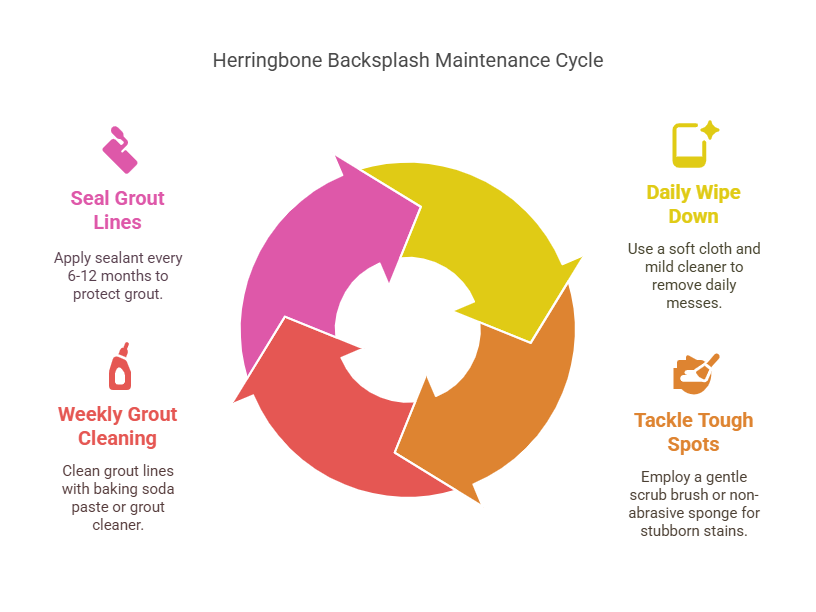
While a herringbone backsplash instantly elevates your kitchen’s style, keeping it looking sharp requires regular upkeep. Wipe down the surface daily with a soft cloth and a mild cleaner to prevent grease and food splatters from settling. For tougher spots, use a gentle scrub brush or a non-abrasive sponge—avoid harsh chemicals, as these can dull the finish or damage grout lines. Pay special attention to the grout, which can absorb stains; clean it weekly with a baking soda paste or a specialized grout cleaner. Seal the grout lines every six to twelve months to repel moisture and stains. By addressing messes promptly and using the right products, you’ll keep your herringbone pattern crisp and beautiful for years to come.
Inspiring Design Ideas for Every Style
Whether your taste leans modern, rustic, or somewhere in between, a herringbone backsplash can adapt to fit your kitchen’s personality. For a sleek, contemporary look, try glossy white subway tiles in a tight herringbone pattern—they reflect light and make your space feel open. Prefer a rustic vibe? Opt for handmade tiles in earthy tones or weathered finishes to add warmth and texture. If you love bold statements, use colored grout or vibrant tiles to create contrast and visual intrigue. You can even mix materials like marble and glass for a sophisticated touch. Don’t forget, the direction of your herringbone pattern—horizontal, vertical, or diagonal—can dramatically change the room’s energy. Choose what feels right for your style and let your backsplash shine.
Conclusion
A herringbone backsplash instantly elevates your kitchen, giving it a timeless, stylish flair. With the right tiles, colors, and materials, you can tailor the look to match any design. Don’t be afraid to try this classic pattern—just follow the steps, use the tips to keep lines crisp, and you’ll love the result. With simple cleaning and care, your herringbone backsplash will keep looking stunning for years. Ready to give your kitchen that wow factor?


.webp)