How Do You Fix Squeaky Floorboards? Easy DIY Solutions

.jpg)
To fix squeaky floorboards, start by identifying the problem areas. Sprinkle talcum powder or graphite in the gaps to reduce friction. If you can, lift the boards and apply wood glue between the board and subfloor for extra support. Tighten loose boards with screws and add shims if needed. Consider installing squeak-relief kits for a more permanent solution. By following these steps, you can restore peace to your home, and there's more to discover about preventive measures!
- Identify squeaky areas by walking on the floor and listening, focusing on high-traffic zones.
- Sprinkle talcum powder or graphite in gaps to reduce friction between floorboards.
- Apply high-quality wood glue between loose boards and the subfloor for added stability.
- Tighten loose floorboards with screws, using wood filler or shims for a snug fit.
- Inspect beneath floorboards for loose nails or gaps, and address any shifts in support beams.
Understanding the Cause of Squeaky Floorboards
When you hear those annoying squeaks from your floorboards, it helps to understand what’s causing them. Squeaky floors often result from friction between the floorboards and the underlying structure, usually due to loose or improperly secured boards. Humidity changes can also lead to wood expansion and contraction, creating those irritating sounds. Sometimes, the subfloor might not be adequately attached, allowing movement that causes squeaking. Additionally, the age of your flooring can play a role; older homes, with their natural settling, often develop these noises. Recognizing these causes empowers you to tackle the issue effectively. By understanding what's happening beneath your feet, you can take the right steps toward a quieter and more comfortable home environment.
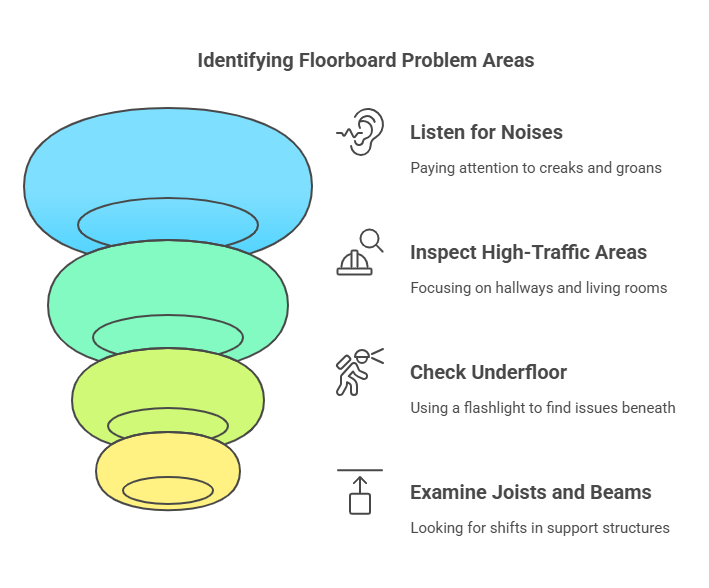
Identifying the Problem Areas
Identifying problem areas in your floorboards is essential for tackling those pesky squeaks. Start by walking around your home, listening carefully for any creaks and groans as you step. Pay attention to high-traffic areas, like hallways and living rooms, where wear is more likely. Use a flashlight to inspect beneath your floorboards, checking for loose nails, gaps, or signs of damage. If you can access the crawl space or basement, look for any shifts in the joists or support beams—this can contribute to the noise. Mark the spots that seem particularly problematic, as this will help you focus your repair efforts later. By pinpointing the trouble areas, you’ll be on your way to a quieter home.
Using Talcum Powder or Graphite
If you’re dealing with stubborn squeaks, using talcum powder or graphite can be an effective and easy solution. First, locate the squeaky area by walking on the floor and pinpointing the noise. Once you’ve identified the spots, sprinkle a generous amount of talcum powder or graphite directly onto the floorboards. These powders act as lubricants, reducing friction between the boards. After applying, use a soft brush or cloth to work the powder into the gaps between the floorboards. This helps it penetrate deeper and maximize the effect. Finally, walk over the area again to test if the squeak has lessened or disappeared. If it’s still noisy, consider repeating the process for better results.
Applying Wood Glue
After trying talcum powder or graphite with little success, applying wood glue can be a solid next step for fixing squeaky floorboards. First, identify the squeaky area and gently lift the board if possible. Apply a high-quality wood glue into the gap between the squeaky board and the subfloor. Use a thin nozzle for precision, ensuring the glue penetrates well. Clamp the board down or place a weight on it to hold it in place while it dries. Allow the glue to set according to the manufacturer’s instructions—usually around 24 hours. Once dry, you can sand any excess glue for a smooth finish. This simple fix can considerably reduce squeaks and extend your floor's lifespan.
Tightening Loose Floorboards
While loose floorboards can be a nuisance, tightening them is often a straightforward fix that can greatly reduce squeaks and improve your home's overall stability. Start by locating the loose boards; you'll often find them near joints or at the edges. Use a drill with a screwdriver bit to drive screws into the loose boards, securing them to the subfloor. If you notice significant gaps, consider adding wood filler or shims to guarantee a snug fit. For extra stability, you can also use wood glue in conjunction with screws. After tightening, walk across the area to check for any remaining squeaks. With these simple steps, you’ll enjoy a quieter and more secure floor in no time!
Installing Squeak-Relief Kits
Tightening loose floorboards can greatly reduce squeaks, but sometimes you need a more specialized solution. That’s where squeak-relief kits come in handy. These kits usually include specially designed screws and a guide for installation. First, locate the squeaky area and verify it’s accessible. Next, drill pilot holes through the floor into the joists beneath. Then, insert the screws from the kit, which will pull the floorboard tight against the joist, effectively eliminating the squeak. Finally, cover the holes with wood filler to maintain a smooth surface. With a little patience and effort, you can silence those annoying squeaks and enjoy a quieter home. Plus, you won’t need professional help to achieve this simple fix!
Adding Support With Shims
If you find that your floorboards are still squeaking despite tightening them, adding support with shims can be an effective solution. Start by identifying the area where the squeak is most pronounced. Carefully lift the floorboard, if possible, to access the joists underneath. You’ll want to insert shims—these are thin wedges typically made of wood—between the joist and the floorboard. Make sure the shims are snug but not overdone; you want them to provide support without causing additional stress. After placing the shims, gently press down on the floorboard to check if the squeak has diminished. This simple method can greatly reduce noise and enhance the stability of your flooring, giving you a quieter home.
.png)
Preventive Measures for the Future
To keep your floorboards quiet in the long run, it’s essential to take proactive steps during installation and maintenance. First, choose high-quality materials that resist warping and shrinkage. Verify proper spacing between boards to allow for natural expansion and contraction. When installing, use screws instead of nails; screws provide a more secure hold and minimize movement. Regularly inspect your floor for signs of wear or damage, and address issues promptly to prevent squeaks from developing. Additionally, consider applying a lubricant, like powdered graphite, between boards during maintenance. Finally, control humidity levels in your home; stable moisture levels help reduce movement in the wood. By implementing these preventive measures, you can enjoy squeak-free floors for years to come.
Conclusion
Fixing squeaky floorboards doesn’t have to be an overwhelming task. With simple solutions like using talcum powder, tightening loose boards, or even installing a squeak-relief kit, you can regain peace and quiet in your home. Plus, by adding shims and taking preventive measures, you’ll keep those pesky noises at bay for good. So grab your tools, tackle those squeaks, and enjoy the satisfaction of a quieter, more comfortable living space!


.jpg)