How to Plan a Small Backyard Wedding at Home

Start by capping your guest count to fit your yard’s usable square footage, then pick a date that suits weather patterns and local noise rules. Draft a lean starter budget—rentals ~40%, food/bev ~25%, staffing ~15%, permits/insurance ~10%, contingency ~10%. Sketch a simple yard map with ceremony, dining, bar, and restrooms, noting slopes and access. Build a basic timeline and test guest flow with friends—because the next step locks in what you’ll actually book.
- Set a realistic guest cap from yard size: 10–12 sq ft per seated guest or 6–8 sq ft standing, then confirm a weather-friendly date range.
- Define your vision and flow: guiding words, seated dinner vs stations, ceremony-to-dancing timeline, and map functional zones to your actual yard.
- Build a simple site plan: measure boundaries and slopes, mark utilities/power, plan 5–6 ft primary paths, and separate quiet zones from noise.
- Create a starter budget and vendor timeline: allocate categories, list must-haves, price-check vendors, and lock rentals/restrooms/power months in advance.
- Plan logistics early: tent and flooring, lighting and power on separate circuits, restroom ratio 1 per 35–50 guests, and permits/insurance 6–8 weeks out.
Backyard Wedding Quick-Start: Your First 7 Steps
Where do you start when your backyard is both venue and canvas? First, set a guest cap based on square footage: allow 10–12 square feet per seated guest, 6–8 for standing. Next, confirm a realistic date range, checking weather patterns and local noise ordinances. Third, create a starter budget: allocate roughly 40% rentals, 25% food/bev, 15% staffing, 10% permits/insurance, 10% contingency.
Fourth, walk the yard and map zones—ceremony, dining, bar, catering prep, restrooms, and power routes. Fifth, measure gradients and access points; note where tents, flooring, and lighting can safely go. Sixth, call the city: permits, parking rules, fire codes. Seventh, reserve essentials now—tents, restrooms, generators, tables, chairs, basic lighting—before vendors book out 8–12 weeks ahead.
Define Your Backyard Wedding Vision
For style ideas that fit your space and budget, gather backyard wedding inspiration from real-home celebrations—note how they use lighting, zones, and simple florals to elevate an ordinary yard without overbuilding.
With your quick-start logistics in place, shift to defining what the day should feel like—and what that means for cost, layout, and timing. Choose three guiding words (e.g., cozy, garden-forward, unfussy) and let them drive every decision. Decide guest experience: seated dinner or roaming stations; acoustic vows or lively dance set. Map zones to your yard’s reality—ceremony sightline, cocktail flow, dinner footprint, dance floor, quiet corner. Note power access, shade, noise, and neighbors’ windows.
Set a timeline skeleton: ceremony, photos, transition, dinner, toasts, first dance, send-off. Assign minutes to each and identify lighting needs by hour. Prioritize non-negotiables—live musician, heirloom china, sunset vows—then flag flexible swaps. Confirm DIY capacity versus rentals and pros. Keep choices consistent with space, schedule, and must-have atmosphere.
.jpg)
Set a Realistic Backyard Wedding Budget
So how do you turn vision into numbers you can actually afford? Start by setting a ceiling number you’re comfortable spending. Split it into categories: food and beverage 35–45%, rentals 15–25%, attire/beauty 5–10%, photography 10–15%, decor/flowers 5–10%, music 5–10%, officiant, permits, insurance, and contingency 10%. List must-haves versus nice-to-haves, then price-check three vendors per category this week to get real quotes.
Create a timeline: lock priority vendors 6–8 months out; book rentals, restrooms, and power 4–6 months; finalize headcount, beverages, and desserts 60 days; pay balances 14 days. Track deposits, due dates, and tips in a spreadsheet. Cut costs with afternoon timing, limited bar, seasonal menus, and mixed seating. Hold 10% in contingency for taxes, delivery fees, and last-minute add-ons.
Map Your Backyard Wedding Layout and Flow
A simple site plan turns your yard into a workable venue and prevents costly last‑minute moves. Measure the property, sketch boundaries, doors, gates, slopes, and low branches. Mark utilities, hose bibs, and power sources. Note sun angles and prevailing wind at ceremony and dinner times. Photograph each zone.
Define functional zones and walkways: arrival, gifts/cards, bar, catering/staging, dance, lounge, photo spot, trash/recycling, and restrooms. Keep 5–6 feet for primary paths and 3–4 feet for secondary. Place quiet zones away from speakers and generators.
Plot vendor access and load‑in routes to protect landscaping. Assign power loads per circuit; label outlets and cable runs to avoid trip hazards. Build a rain/heat pivot on the same map. Finalize by Week 6; test the flow with friends by Week 4.
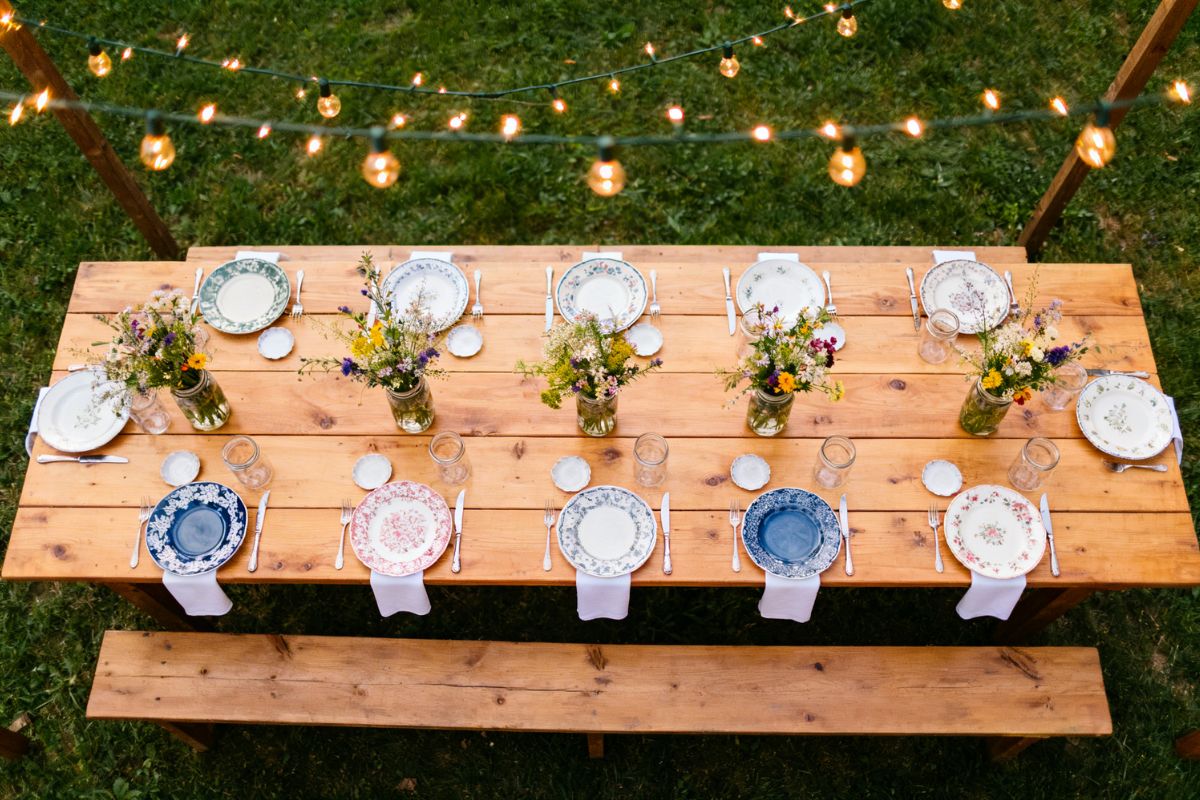
Design Seating, Ceremony Space, and Aisle
Before you rent a single chair, lock the headcount, ceremony start time, and layout constraints from your site plan, then back into seating and aisle dimensions. Seat 8–10 chairs per row with 18–20 inches per chair; allow 36–42 inches between rows for knees and service. Set a minimum 48-inch aisle; bump to 60 inches if you’ll process with attendants or a dress train. Plan 6–8 feet depth for the altar area and 8–12 feet width.
Choose chairs that stack and deliver locally to cut costs; reserve 5–10% extras. Create two reserved front rows for family. Place the arbor upwind and with sun at guests’ backs for photos. Mark aisles and row ends with low-profile decor. Do a timed rehearsal to confirm flow.
.jpg)
Plan Lighting, Power, and Sound for Your Yard
Where will guests need light, power, and clear audio from arrival to last call? Map pathways, entry, bar, restrooms, dining, dance floor, and parking. At week 8, list fixtures: solar path stakes, LED string lights, clamp work lights for prep, clip-on uplights for trees, a dimmable fixture over dining. Choose warm-white LEDs (2700–3000K) and weather-rated cords.
At week 6, count outlets and total wattage. Rent a quiet inverter generator if circuits won’t cover DJ, catering warmers, and lights. Create two circuits minimum: sound on one, lighting/catering on another. Use outdoor GFCI, heavy-gauge extension cords, and cord covers.
At week 4, test microphones and speakers; place speakers forward-facing, waist-high, angled from neighbors. At week 1, full rehearsal after dark; adjust brightness, cable runs, and volumes.
Handle Permits, Insurance, Noise, and Neighbors
Even if you’re keeping it small, secure approvals early so nothing jeopardizes your date. Six to eight weeks out, confirm whether your city requires a temporary use permit, assembly permit, or amplified-sound permit. Ask about guest caps, end times, parking, and open-flame rules. Budget $25–$300 for filings and potential inspection fees. If you have an HOA, submit your event notice and any required forms now.
At the same time, call your insurer. Request a one-day event rider or special event policy with host liquor liability; aim for $1–$2M coverage and name vendors as additional insureds. Expect $75–$250.
Four weeks out, deliver neighbor notices with start/end times, parking plan, and a contact number. Set a firm music cutoff (often 9–10 p.m.). Assign a decibel monitor and escalate volumes gradually.
Choose Tents, Flooring, Furniture, and Restrooms
How will guests move, sit, and stay dry if weather shifts? Book a frame tent 3–4 months out; measure your lawn, note setbacks, and choose sidewalls, gutters, and heaters or fans based on your season. Add clear floor plans with 5-foot aisles, 10-foot fire egress, and marked dance or ceremony zones. Prevent muddy shoes with interlocking floor tiles or plywood subfloor; price both and reserve 6–8 weeks ahead.
Count seats: ceremony chairs for all, reception seating at 80–90% if you’re staggering activities. Mix tables to fit the footprint; confirm linens match sizes. Budget lounges sparingly; prioritize sturdy folding chairs plus a few benches. For restrooms, rent 1 unit per 35–50 guests for 4 hours; place them discreetly, light pathways, add sanitizer, and schedule delivery the day before.
Coordinate Food, Drinks, Staffing, and Cleanup
When should you lock vendors and map service flow so dinner stays hot and glasses stay full? Secure catering, bar, and rental add-ons 3–4 months out; confirm headcount and menu six weeks out; finalize counts, dietary notes, and service timeline two weeks out. Choose service style—buffet, plated, or family-style—based on guest count, kitchen capacity, and budget. Plan 1 server per 15–20 guests; add a captain if running courses.
For bars, stock 1 drink per person per hour; assign 1 bartender per 50–60 guests. Designate staging areas for hot-holding, plating, and bar backstock; run power and lighting checks. Rent bussing tubs, compost/garbage cans, and liners. Schedule staff for breakdown and trash hauling; confirm who handles rentals, dishes, and backyard sweep.
.jpg)
Build a Simple Backyard Wedding Day Timeline
With food, drinks, and staffing sorted, put it all on a clock so vendors sync and you avoid overtime. Start backward from your noise curfew. Slot load-in 3–4 hours before guest arrival, with power checks and a quick rain plan review. Schedule photos before the ceremony to protect light and budget.
Sample flow: 3:00 vendor arrival, 4:30 guest seating, 5:00 ceremony (20 minutes), 5:25 family photos, 5:45 cocktail hour, 6:30 dinner service, 7:30 toasts, 8:00 first dance, 8:10 open dancing, 9:30 dessert, 10:00 last call, 10:15 send-off, 10:30 breakdown.
Build 10-minute buffers between segments, and lock vendor end times. Stagger staff: fewer during ceremony, more for flip and dinner. Text the timeline to all vendors, designate one point person, and print porch copies.
Conclusion
You’ve got a clear plan: cap the guest list to fit your yard, set a weather-smart date, and lock a budget with rentals ~40%, food/bev ~25%, staffing ~15%, permits/insurance ~10%, contingency ~10%. Map zones, paths, and access, then test the flow. Secure permits, alert neighbors, and confirm noise limits. Book tents, flooring, furniture, and restrooms early. Finalize menus, staffing, and cleanup. Build a tight timeline with load-in/out. Rehearse two weeks prior, refine, and enjoy your at‑home wedding.