
Interior Design Ideas for Exposed Timber Trusses That Don't Look Like Fake Beams


Exposed timber trusses stop buyers in their tracks. Zillow’s Buzz Index, released April 16, 2026, found that listings mentioning exposed beams enjoy nearly a 20 percent surge in daily engagement, the biggest lift among 600 home features.
But we’ve all stepped into rooms where the “rustic” beams feel like hollow stage props.
This guide shows you how to spot real load paths, model a truss in SelfCAD, and align finish, lighting, furniture, and services so the ceiling reads as honest structure, not décor.
Before you start: know whether you have a beam, truss, rafter, or joist
First, label each part correctly; mistakes cost money later.
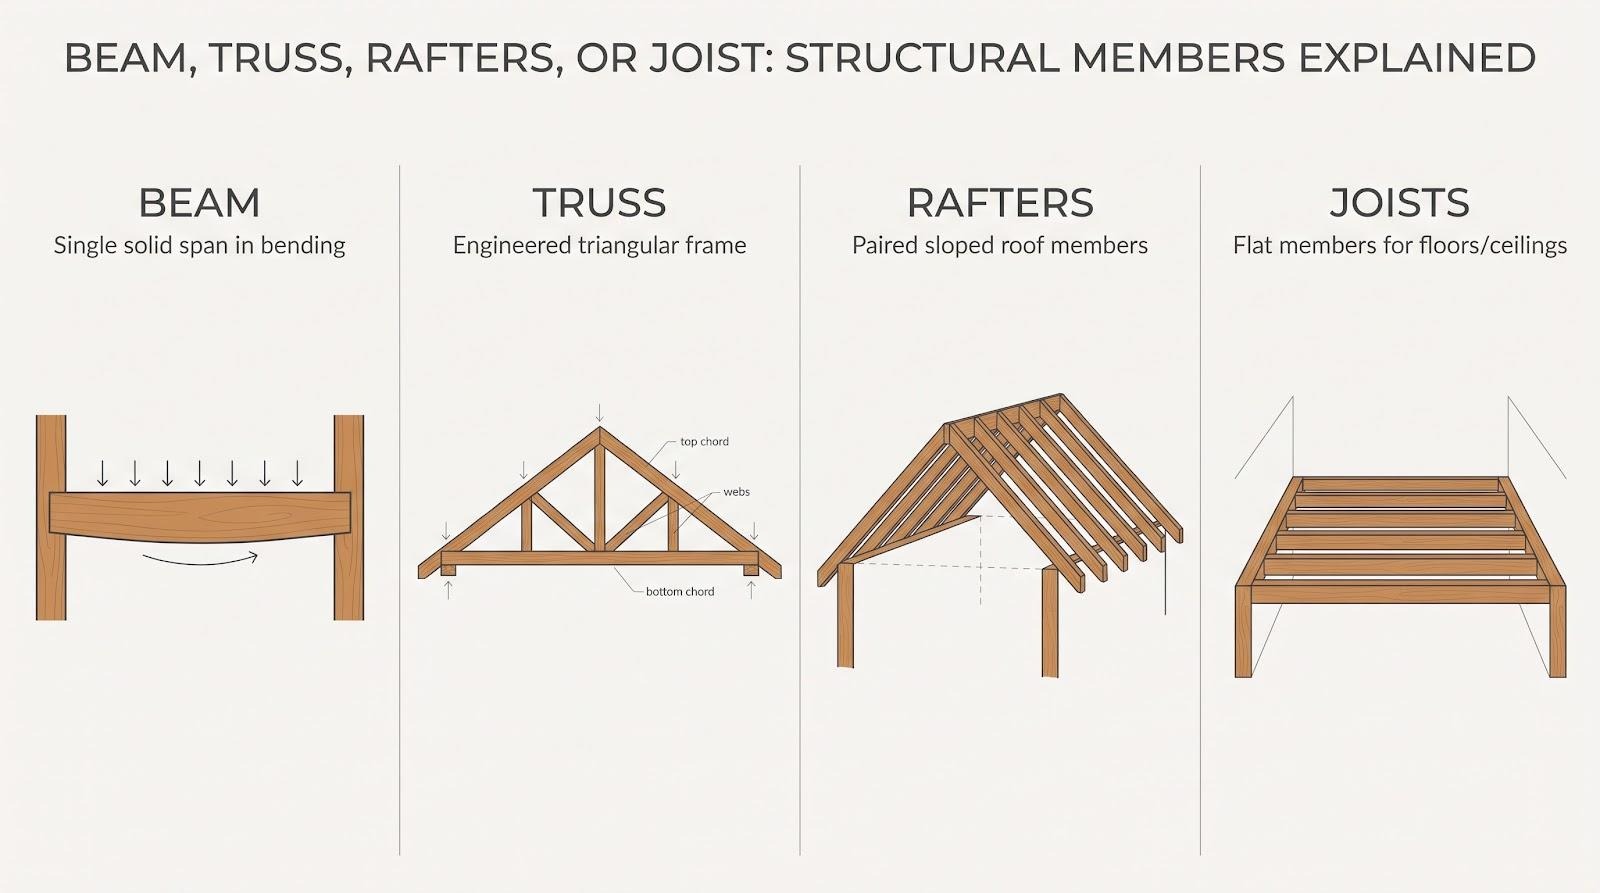
Beam. A single, solid member that resists loads mainly in bending. Picture one hefty timber running wall to wall.
Truss. An engineered team: top and bottom chords plus web members form triangles that span wide without sag. The metal-plate triangles you see in new attics match the American Wood Council’s Wood Truss Awareness Guide definition.
Rafters. Paired sloped members marching from ridge to wall.
Joists. Flat cousins that carry a floor, or a flat ceiling, under a pitched roof.
Why fuss over labels? Each member handles force differently. A chandelier hung from a rated beam is usually fine once an engineer checks the load. Hang that same fixture from a decorative box truss and you’ve asked a hollow shell to do real work.
Before you sketch a single line in SelfCAD, confirm what you have: climb into the attic, review the drawings, or bring in a pro for a fast structural sanity check. And never cut, drill, or bolt into any member until an engineer signs off; the design only works if its bones are sound.
Pick the truss, pick the focal point
Every truss profile sets a rhythm. When that rhythm aligns with the room’s “hero” feature, the ceiling stops acting like décor and starts guiding the whole composition.
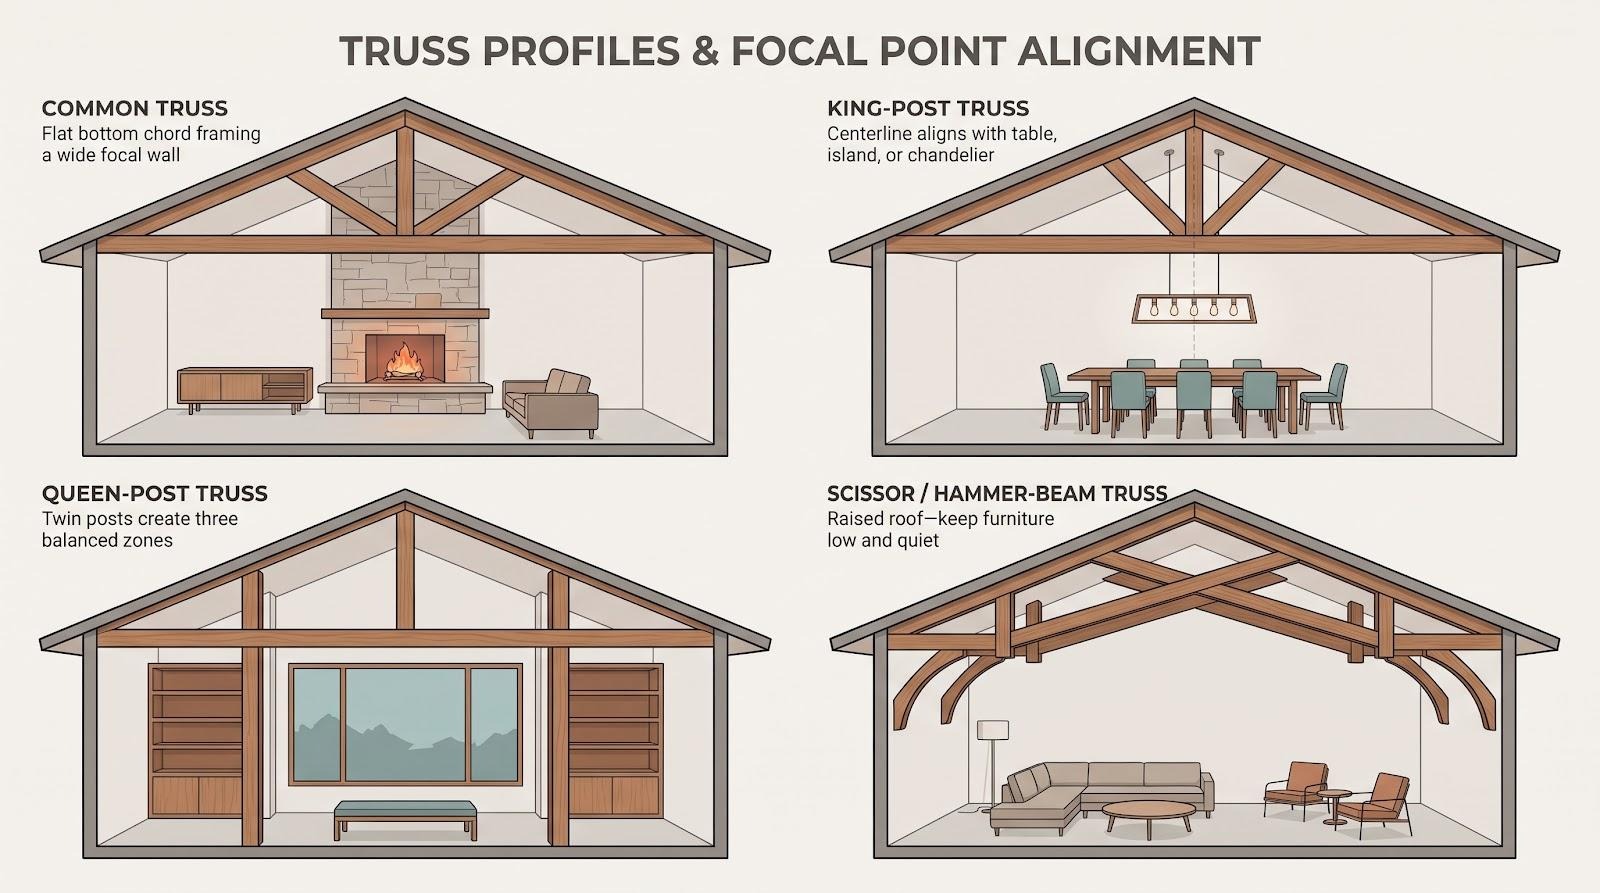
Common truss. Its bottom chord runs flat across the span, a visual rail that frames a wide hearth or a bank of sliding doors.
King-post truss. One vertical member lands at the center; perfect for anchoring a dining table, island, or chandelier.
Queen-post truss. Twin posts split the span into three balanced zones, great for built-ins or a picture window while leaving the center open.
Scissor or hammer-beam truss. Both lift the roof at mid-span, giving tall living areas extra height; keep furniture low so the structure stays in the spotlight.
Hamill Creek Timber Homes, a timber frame designer and manufacturer, lays out five classics (common, queen-post, king-post, hammer-beam, and scissor) in its illustrated rundown of types of timber frame trusses. The guide notes that a timber truss can span as much as 90 feet, although very long spans are harder to transport, erect, and brace, which gives designers room to treat the truss as both structure and focal line.
Its Foothills Ranch home in southern Alberta shows the concept in the wild: Douglas fir roof trusses with queen posts and knee braces frame a great room overlooked by a loft, while large gable windows pull light down through the structure.
Choose the truss first, then echo its geometry in furniture, lighting, and art. When plan and structure speak the same language, guests stop asking whether the beams are real; they simply feel right.
Model the room and one truss in SelfCAD before you lift a hammer
Many teams pick stain colors before checking a sight-line. A quick measured model prevents that mistake.
- Set the canvas. Enter your room’s exact width, length, wall height, and roof pitch in SelfCAD’s Scene Settings. You’re working with facts, not guesses.
- Sketch a single truss. Activate 3D Sketch (shortcut K) and trace one truss profile on the correct roof plane. Extrude each chord and web to full size so you sense the real visual weight. Then use Copy Offset to repeat the truss at the on-center spacing your supplier specifies, say every 36 inches across a 24-foot span.
- Add context. Drop in simplified walls, windows, and big anchors (fireplace, island, dining table), and orbit the model at standing and seated eye level. Does the tie beam cut the lake view? Does the king post align with your chandelier? Catch those misses here, not on site.
- Test light and finish. Save three versions (daylight, evening, midnight), then toggle finishes with one click. Walnut may glow at noon but feel cave-like after dark; the render tells the truth.
- Record the process. Hit Record Tutorial to capture clicks and camera moves; share the file with your builder or spouse so everyone sees the same ceiling before any cuts are made.

Remember, this is visualization and coordination, not structural analysis. An engineer still decides what spans, what connects, and what stands.
Make the load path look real
A ceiling loses credibility the moment a “beam” disappears into drywall for no reason. We trust timber only when every member plainly shows how it carries weight.
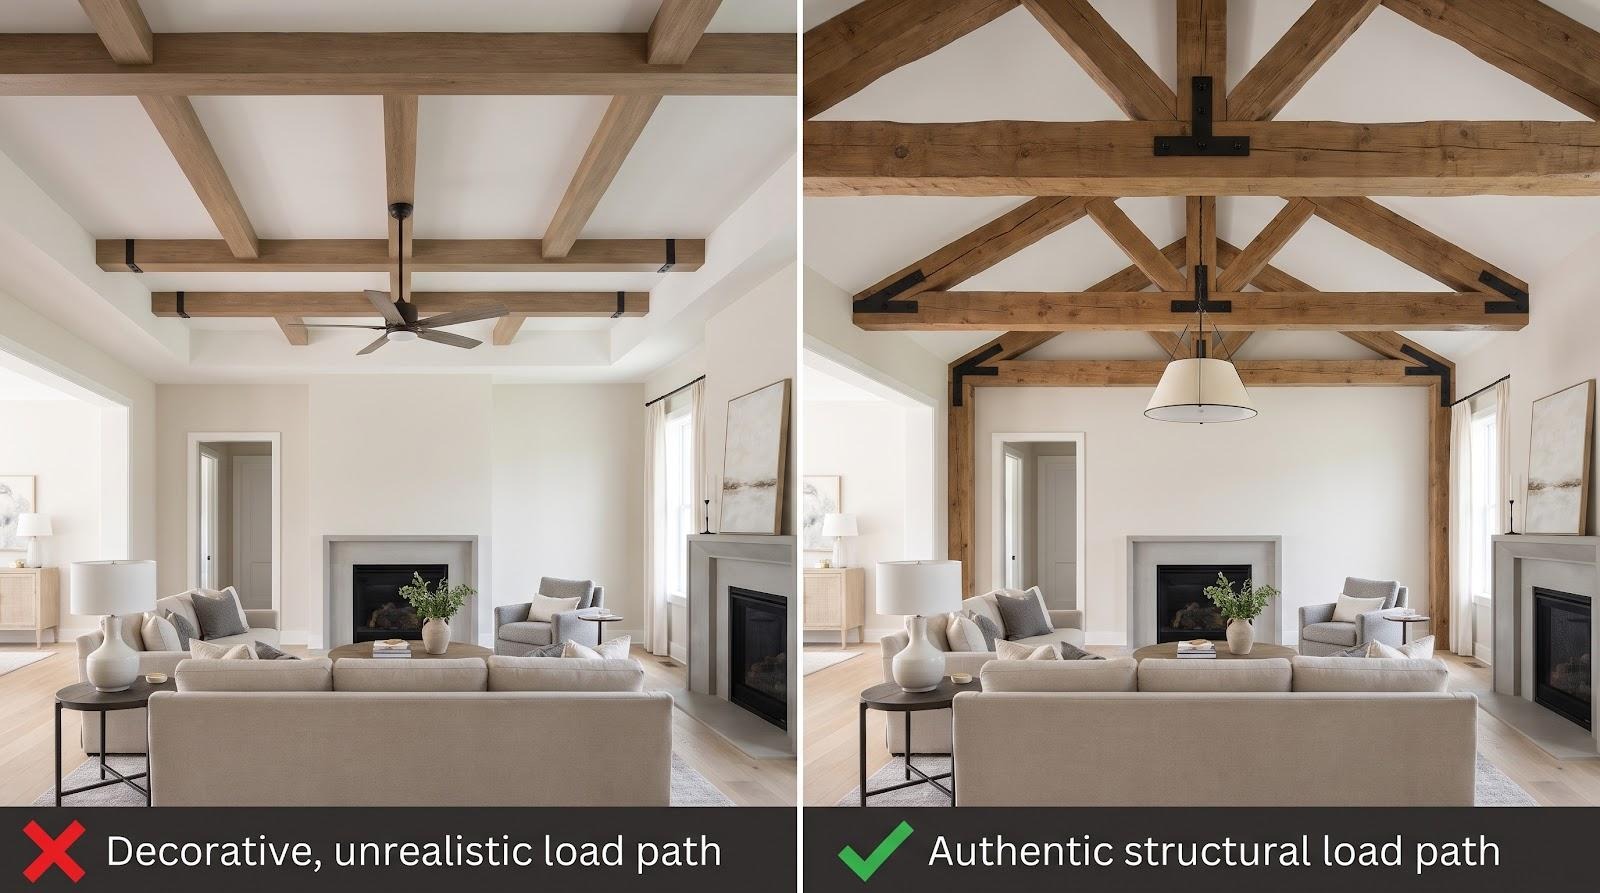
Anchor the ends. Each chord must land on a post, wall, or crossing beam that can plausibly take the load. Let a tie beam float mid-air and the story collapses.
Mind the size. A 2-inch-thick “beam” stretched over 20 feet feels like a movie set. According to American Wood Council span tables, even a 2 × 12 tops out around 15 feet at residential loads, so keep member depth proportional to room volume and repeat it bay after bay.
Show real connections. Bolts, plates, and tenons belong where forces meet. Strap iron tacked to the middle of a clear span screams “decor.”
Let wood be wood. Perfectly repeating grain or mid-span scarf joints hint at factory shortcuts. Authentic timber varies in color, checks, and texture; a bit of imperfection sells the truth.
Follow gravity. Trusses should track roof pitch, not criss-cross at random. Lights and fans must hang from genuine structure or rated hardware, never hollow boxes.
When every line, joint, and termination tells the same structural story, guests stop wondering if the beams are fake; they simply feel the room’s bones doing their quiet work.
Choose contrast, not just color
Picking “a nice stain” feels harmless, until the ceiling shifts from statement to eyesore. Think contrast first, hue second.
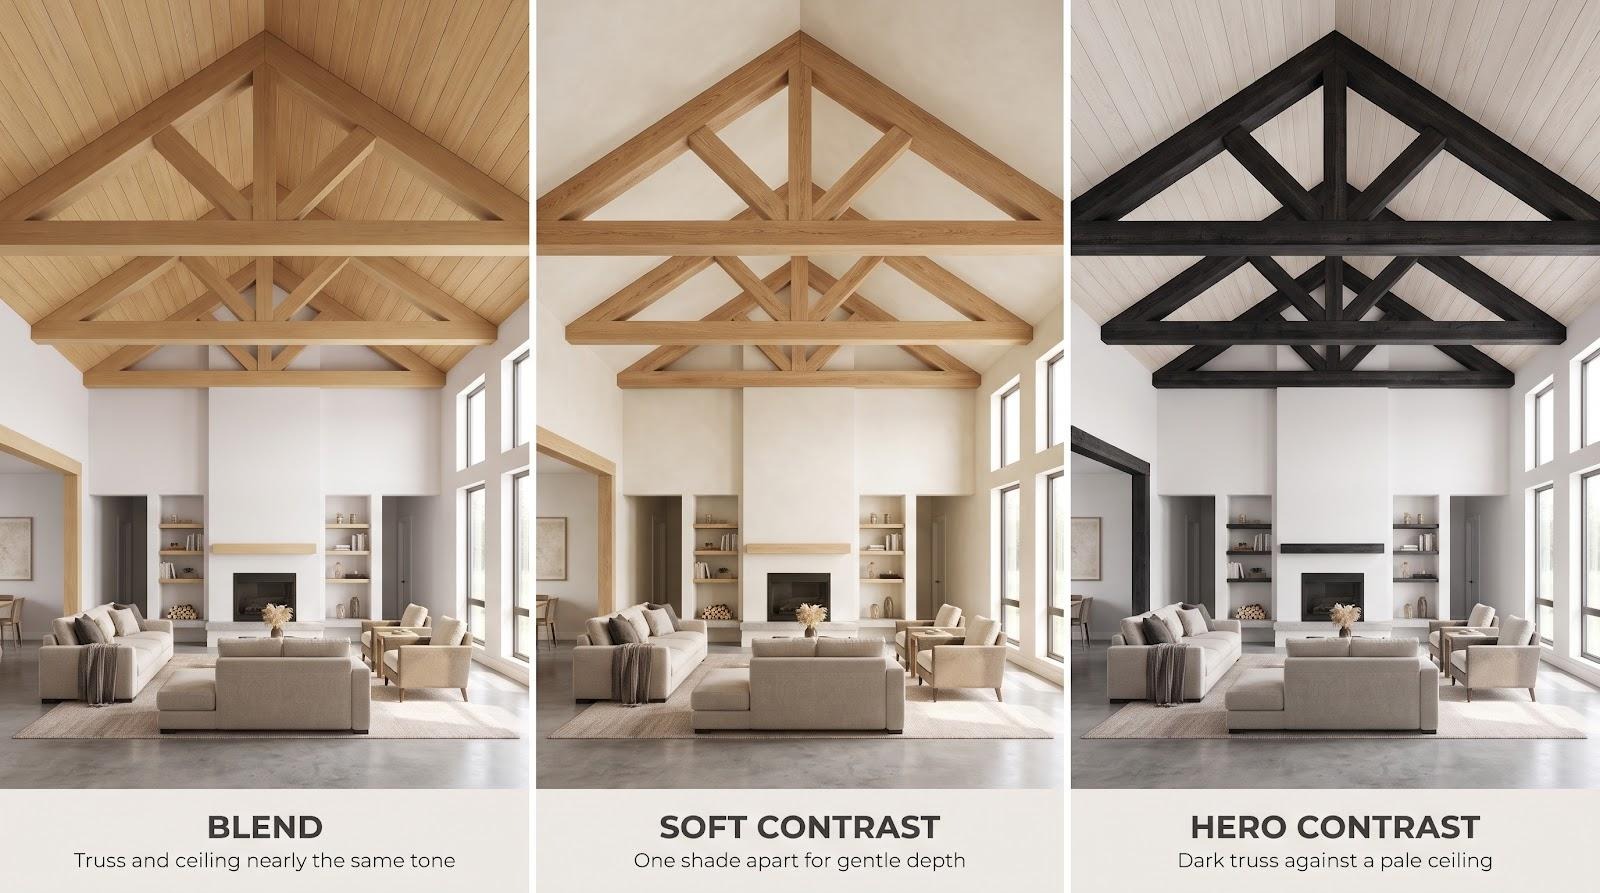
Blend. When truss and ceiling share nearly the same tone, they merge into a calm field where shadow, not color, defines the pattern. Warm pine against a honey plank lid soothes narrow rooms or busy décor.
Soft contrast. One shade apart, such as natural white-oak trusses against a creamy lime-plaster lid, adds depth without drama. Daylight warms the wood, and evening lamps let the plaster glow.
Hero contrast. Charred or deep-walnut trusses cut across a pale deck like calligraphy. Save this move for rooms with real height and generous daylight; otherwise, the beams steal the oxygen.
Whatever path you choose, test finish samples on the actual species. View them beside walls and floors at noon, then again after dark. USDA Forest Products Laboratory botanist Alex Wiedenhoeft notes that cherry and mahogany deepen much faster in direct sun than in shade, while a seven-year window test showed walnut often turns lighter. Plan for that shift instead of chasing a “perfect” shade that will not stay put.
Treat the ceiling and trusses as one assembly
The ceiling is not background wallpaper for your beams; it is the canvas that sets their depth, texture, and mood.
Plaster or limewash. A smooth lid turns the timber into crisp graphic lines, ideal for modern or Scandinavian rooms that prefer quiet over spectacle.
Pale tongue-and-groove boards. Replace plaster with soft boards and the whole lid feels hand-crafted, cabin-like without sliding into full rustic. The lighter surface echoes the wood below while letting hefty truss members stay in charge.
Full wood wrap. Cover both decking and truss in the same species and tone, and the ceiling cocoons the room like a warm blanket. Balance that richness with stone, linen, and generous glazing, so the space does not feel boxed in.
Watch the trim trap: crown or panel moldings wedged between members make structure look pasted on. Keep junctions clean, let shadows carve the depth, and let grain, not a maze of profiles, deliver character.
Use a style palette without turning the room into a theme
Trusses suit many aesthetics, so avoid locking yours into a single storyline.
Minimalist. Paint the timber soft white, pair it with smooth plaster, and pick low, spare furniture; the beams recede into quiet geometry that shapes negative space.
Organic modern. Leave the wood natural, let lime-washed walls glow, then layer stone, wool, and a few rounded pieces. Contrast stays gentle and every surface feels touchable.
Heritage charm. Deepen the timber stain, warm the plaster, add vintage pendants and patterned textiles; stop short of wagon wheels and barn signs because a hint of antiquity goes a long way.
Industrial hybrid. Mix natural timber with blackened-steel connectors, add brick or concrete accents, and expose hardware only where structure needs it. Authenticity beats clutter every time.
When you settle on a palette, echo each dominant material once or twice elsewhere, then move on. That rhythm links ceiling, walls, and furnishings without slipping into costume territory.
Align lighting, fans, and services with the truss bays
Great trusses deserve equally disciplined lighting, so lay out fixtures on the reflected-ceiling plan before installation day.
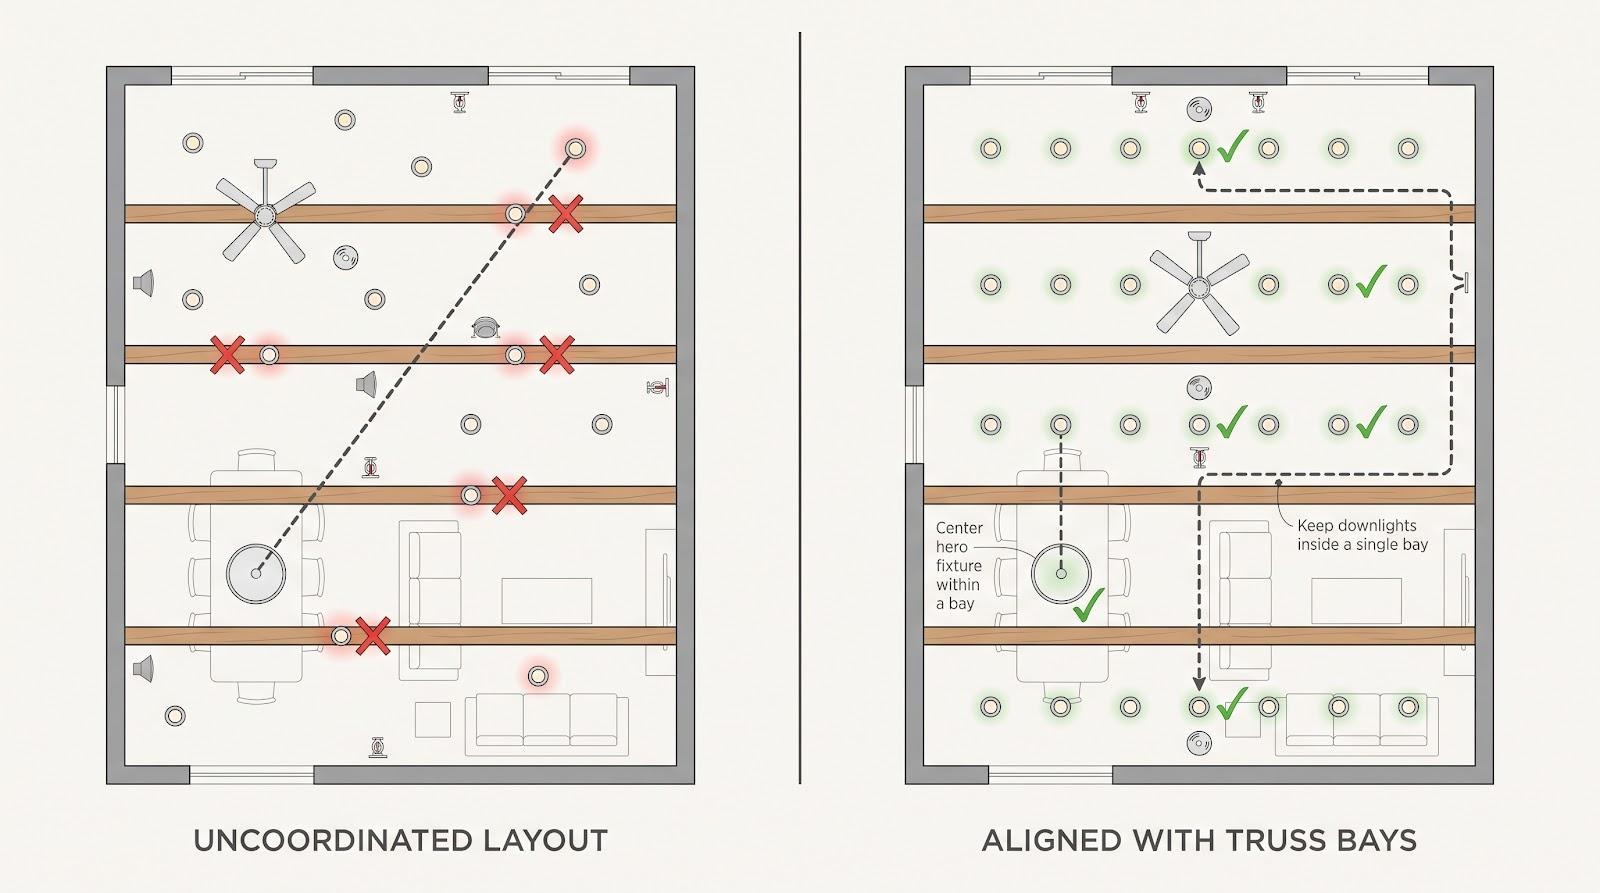
Center the hero piece. Drop pendants or chandeliers over the furniture they serve, then nudge the canopy so the stem falls cleanly between chords. When light shares an axis with the truss, cords will not compete with wood.
Stay inside the bay. Recessed or surface spots belong within one bay, not straddling two. That rule keeps trim rings, ducts, and sprinkler heads marching in rhythm with the structure.
Test glare after dark. Uplights that graze timber texture add drama, but aim them to avoid ceiling hot spots. Downlights should light faces rather than cast zebra shadows through the web.
Park the utilities. Fans, smoke detectors, and speakers need a home too. Reserve a secondary bay or cluster them symmetrically along the centerline so gravity-read objects never look tacked on.
Run the wires logically. Route conduit down a post, across the floor, then up a wall instead of snaking across exposed wood. When every service respects the bays, the ceiling reads as one intentional composition.
Ground the vertical volume with furniture and rugs
A soaring truss ceiling thrills visitors, but the excitement fades if the furniture feels like dollhouse props on a giant stage. Proper scale pulls the room back to human height.
Lay the rug first. Choose a rectangle large enough to hold every front furniture leg, ideally the entire seating group; it pins conversation to the floor and balances the drama overhead.
Choose weighty silhouettes. Broad sofas, generous chairs, and a substantial dining table echo the strength of the timber above, while spindly pieces vanish under a cathedral roof.
Play with height. One tall bookcase or drapery panel that rises to the truss spring line stitches ceiling to floor, yet most pieces should stay low to preserve openness.
Align with the bays. Anchor the fireplace, island, or table inside a single truss bay so circulation flows naturally around posts and tie beams.
Protect walkways. Leave at least 36 inches of clear space, matching NKBA traffic-lane guidance, so guests move freely without ducking or detouring.
When your furniture, rugs, and structure share the same rhythm, the volume feels tailored to people, not just impressive for photos.
Let truss rhythm zone an open-plan room
An open plan feels free until furniture floats without purpose. Your truss spacing gives you a ready-made grid that brings order back.
One bay, one function. Assign living, dining, and kitchen zones to individual bays or clean multiples. A king post centers the dining table, while twin queen posts frame built-ins that anchor the lounge.
Echo the lines below. Reinforce those invisible walls with area rugs, ceiling-infill shifts, or pendant clusters. Because the divisions ride on real geometry overhead, they read as architecture, not an afterthought.
Respect the cadence. Avoid letting sofas or islands straddle two bays without a compelling reason. When circulation follows the same beat as the roof, people move intuitively and the whole room feels designed from the rafters down.
Plan daylight and wood aging together
Sunlight loves wood, but it plays favorites. South-facing clerestories can bleach light species and deepen cherry or walnut within a few seasons, while north-side skylights bathe timber in cooler light that preserves tone but sharpens every joint shadow.
Before you cut a roof opening, run your SelfCAD model through morning, noon, and evening light. Watch how direct beams shift shadows and either reveal or flatten grain; a king-post silhouette that looks razor sharp at dawn may blur by late afternoon.
Aim new windows so their mullions align with truss webs, not through them, and you will avoid awkward sky slivers while keeping the structure legible.
Finish samples matter too. Test them under full daylight and warm LEDs: a café-brown stain may glow at noon yet read muddy at sunset. Research shows wood changes fastest in the first six months of UV exposure, with species such as maple darkening and walnut lightening, so pick a slightly cooler tone now if you want a balanced hue later.
Design with the sun, and the ceiling’s character will deepen gracefully year after year.
Add acoustic softness without hiding the trusses
Vaulted timber rooms love to echo; wood, plaster, and glass bounce every laugh and playlist beat right back at you. The cure is texture, not volume.
Start at the floor. A thick wool rug can cut mid- and high-frequency chatter by up to 30 percent, right where people sit. Upholstered seating and throw pillows add another soft layer.
Treat the walls. Hang canvas art or mount linen-wrapped panels between windows; they sip reverberation without stealing attention from the ceiling.
Target the hot spots. Still hear slap echo? Slip narrow slatted absorbers into one or two truss bays. Finished in matching timber, they read as architecture, not studio foam; keep them shallow so the main silhouette stays intact.
Silence the hardware. Line ductwork, specify quiet fans, and isolate speaker mounts so bass will not rattle the wood. Good sound feels invisible when every surface plays its part and the structure stays on full display.
Hide insulation and services in a deliberate layer
Exposed timber stays breathtaking only if the roof above it remains dry, warm, and airtight. That job happens out of sight, but you will always feel the result.
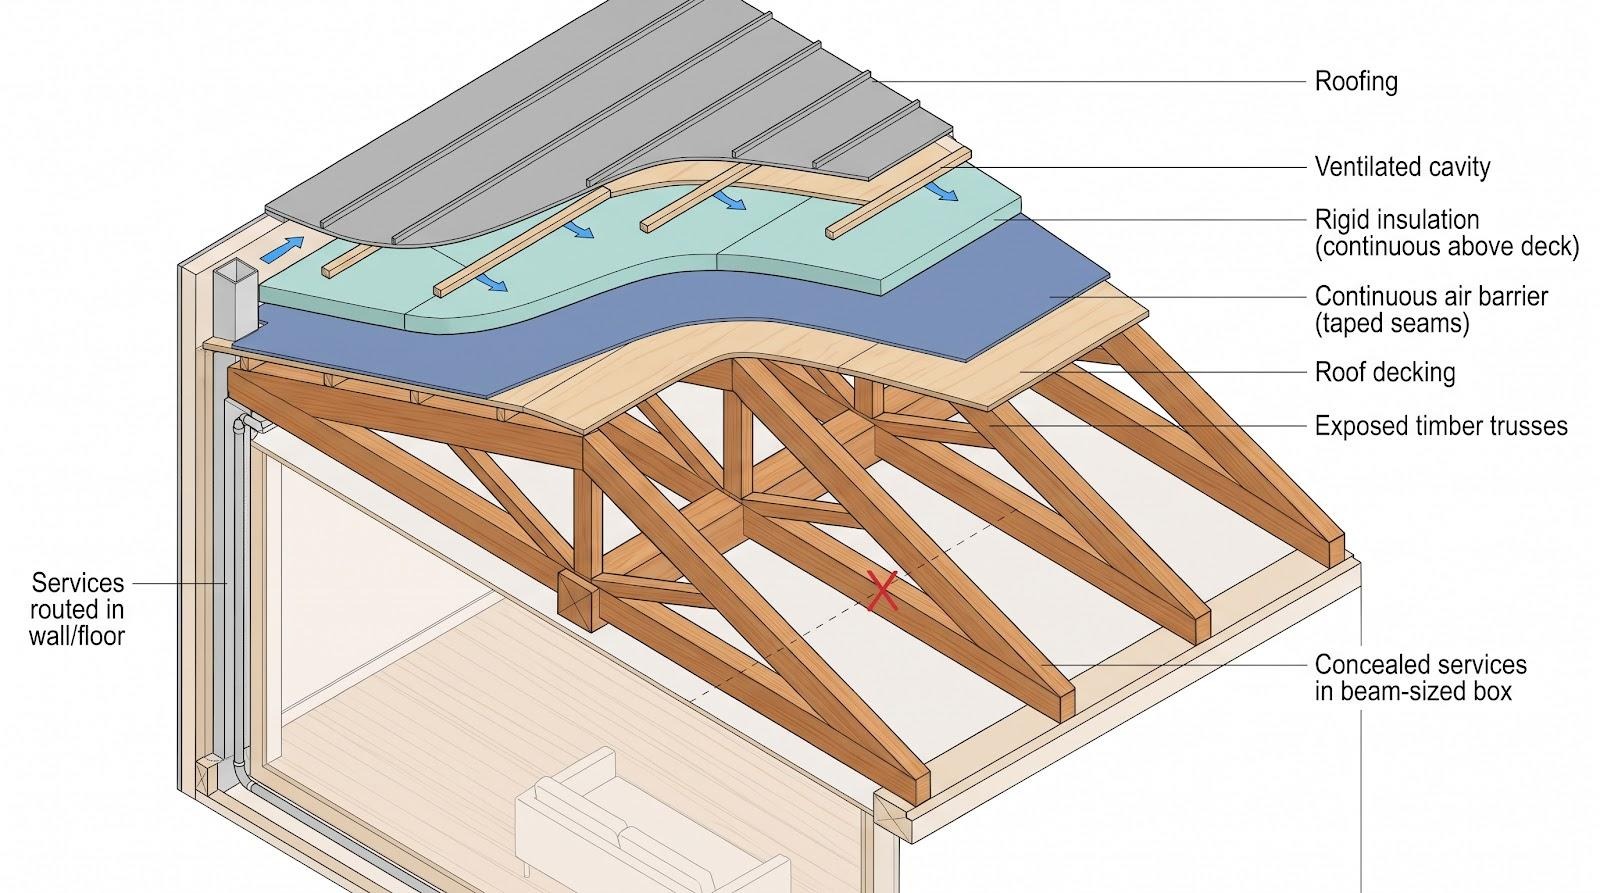
Start with climate.
- Cold zones: Add continuous rigid insulation above the roof deck to keep the timber warm and the deck above the dew point; WoodWorks notes this blanket also controls thermal bridging and condensation risk.
- Humid zones: Use vented cavities or smart vapor-control layers so moisture can escape before it condenses on cool wood, according to guidance from Building Science Corporation.
Seal the air layer. A taped sheathing or membrane over the decking locks conditioned air inside. Building Science Corporation recommends placing the air barrier right under the rigid insulation for durability.
Plan the services. Route ducts, pipes, and cables through walls, floors, or a reserved chase, and never across the ceiling plane. If a line must cross, hide it behind a beam-sized box that follows the truss rhythm.
Expect surgery in remodels. Peeling drywall rarely reveals a code-ready assembly; budget for exterior insulation, new underlayment, and possibly a raised vented curb to keep those timbers dry.
Invisible layers make the visible design possible. Treat them with as much intention as the finish and the room will feel comfortable, quiet, and leak-free for decades.
Specify timber and finishes for health and planet
Beautiful wood rings hollow if its story begins in an illegal clear-cut or ends with solvent fumes indoors.
Demand certification. Ask suppliers for FSC or PEFC chain-of-custody papers, or documented reclaimed provenance; these programs verify legal harvest and forest regeneration.
Read the EPD. Environmental Product Declarations list kilograms of CO₂ per cubic meter; choose the option with the lower number and longer service life, because durability is sustainability’s quiet partner.
Go low-VOC. Pick third-party-tested oils, hard-wax, or water-borne poly with VOC content below the 275 g/L limit set by California’s SCAQMD Rule 1113, and ventilate well during cure.
Grade reclaimed beams. A structural engineer should inspect for hidden checks, tunnels, or embedded nails before the timber re-enters service.
Sustainable choices rarely shout; they sit overhead doing quiet work for the house and for everyone breathing inside it.
Final pre-construction checklist
- Confirm structural status with a licensed engineer.
- Ban unapproved cuts, holes, or extra loads on any member.
- Approve truss form, spacing, and support points in SelfCAD, and get sign-off from all parties.
- Sign finish samples viewed in daylight and lamplight.
- Test furniture layout, rug size, and circulation at full scale.
- Align lighting, fans, sprinklers, and detectors to truss bays.
- Coordinate HVAC, plumbing, and wiring outside the exposed ceiling.
- Order acoustic absorbers for their designated bays.
- Detail roof insulation, air barrier, and ventilation strategy.
- Document timber sourcing, EPDs, and low-VOC finishes.
- Reconcile the SelfCAD model with stamped construction drawings.
Tick every box and you will enter construction with confidence, not crossed fingers.
Frequently asked questions
Can exposed timber trusses suit a modern interior?
Yes. Keep the geometry clean, choose pale or painted finishes, and coordinate lighting so the structure reads as elegant lines rather than rustic décor.
Should trusses match or contrast with the ceiling?
Match for a quiet, texture-first look; use soft contrast for balanced warmth; reserve bold contrast for rooms with ample height and daylight.
Are all visible trusses structural?
No. Many are decorative shells, so verify load paths with a licensed engineer before you add loads or drill holes. If you order a genuine timber frame, ask the supplier who engineers it; Hamill Creek, for example, provides structural engineering licensed in all Canadian provinces and U.S. states.
Can I hang a ceiling fan or chandelier from a truss?
Only from a member or hardware rated for the load and signed off by your engineer; decorative boxes are never safe anchor points.
How do I insulate a roof while keeping trusses exposed?
Use continuous insulation above the roof deck or design a vented cavity that meets local energy code and moisture-control requirements.
What tames echo in a vaulted timber room?
Layer soft surfaces such as rugs, upholstery, and fabric art, then add discreet absorbers between selected bays; address mechanical noise at the source.
Does SelfCAD replace structural calculations?
No. It visualizes proportion and layout so you can make design decisions early, but engineering remains a licensed professional’s job.
Conclusion
Exposed trusses look honest when the structure, not the styling, sets the rules. Start by confirming what you actually have and who signs off on it. Pick a truss profile that frames the room’s focal point, model it at full scale before anyone cuts wood, and make every chord land on something that can plausibly carry it. Then let finish, lighting, furniture, acoustics, and services follow the truss bays instead of fighting them. Do that, and the ceiling reads as real bones doing quiet work, not a row of props.


